
This guide will show you how to start seeds indoors. Answering all your questions from a to z such as, how do I choose a grow light? When do I start my seeds indoors? What soil type should I use to start my seeds in? When do I fertilize my seedlings? And much more. So dive in and get your seeds ready!
Disclosure: This post contains affiliate links. As an Amazon Associate I earn from qualifying purchases.
CHOOSING THE PROPER LOCATION FOR STARTING SEEDS INDOORS
When starting seeds indoors, you want to choose a bright location. An ideal location would be a large south facing window. This will provide ample light for your seedlings.
However, no matter how bright your window is, seedlings always seem to get dangly when placed near a window. To minimize that, you can rotate your seedlings once a day about a quarter rotation.
Before I continue, it is important to mention that most seeds do not require light to germinate. So really, for most seeds, you need to provide them with light once they have germinated.
If you are looking to stop your seeds from turning out dangly all together. Then you need to use a grow light system. You could either purchase a grow light system, or create your own.

HOW TO CREATE YOUR OWN DIY GROWL LIGHT SYSTEM
Creating your own DIY grow light system to give your seedlings a good start, is very simple.
Here is what you’ll need:
- Shelving
- LED lights with chains
- Aluminum foil
- An extension cord
Connect the Led lights to the shelving unit using the chains provided with the lights. cover the shelf, where the LED light is connected to, with aluminum foil, shiny side down. This will help reflect the light at the plants. Connect the LED lights together, Connect the bottom, or top LED light to the extension cord, depending on where your outlet is located.
That’s it! For shelving, really any shelving could work as long as it does not hold on to water, rust, or warp. This is why choosing chrome shelving is ideal, plus it’s economical.
The brighter the LED lights you choose, or the more lumens they have, the less likely you’ll have to lower and raise them.
When choosing LED lights, it is important to choose ones that can connect to each other, and come with chains.
Depending on how strong your LED lights are, you’ll have to raise and lower them close or far from your seedlings depending on the stage of growth your seedlings are in.
If you notice that your seedlings are becoming dangly, than there is a chance that you have your seedlings too far off from the light, you do not have enough light, or your light is not strong enough.
You can use my affiliate links to purchase both the LED lights and the shelving units. This is the same setup that I currently have at our house.
before you decide on which shelving units, and LED lights you want to use, first make sure that you have the space for them.
Make sure that the length of your LED lights is the same as the width of the shelving units that you choose.
You might need to use two LED lights on each shelf to make sure that the plants are getting plenty of light.
HOW TO CHOOSE THE RIGHT SEED STARTING MIX
Can you grow your plants in regular old dirt? The answer to that is yes, but here is why you shouldn’t do it especially as a beginner gardener.
Dirt that comes from outside has a lot of problems. It could carry bugs, diseases, seeds from other plants or weeds, and the list goes on.
First, you do not want to have to figure out which seed did you plant, and which seed did nature plant. That can be a nightmare when you are a beginner gardener and still cannot identify seedlings.
Second, you do not want to have to battle diseases and pests right off the bat. That is a nightmare in itself.
That is why it is important to start your seedlings in a seeds starting mix.
Seed starting mix is different than potting soil. Potting soil is denser. It does not have as much air an fluff as seed starting mix does. Therefore, potting soil makes it more difficult for seeds to germinate.
Potting soil also does not have the proper nutrient for seedlings. While seed starting mixes are designed to have the “fluff” that will allow seeds to easily germinate, and also provide the seedlings with the proper nutrients when they first germinate.
Choosing your seed starting mix should not be complicated. Most seed starting mixes will do the job. I personally have had success with all the seed starting mixes that I have tried so far.
CHOOSING SEEDS
When choosing seeds, you want to figure out first if you want hybrid or heirloom seeds.
What Are Hybrid Seeds?
Hybrid seeds are seeds from plants that have been bread from a variety of the same plants to produce a desirable outcome.
They have genetics from two varieties of plants from the same specie. Hybrid plants are NOT GMO.
GMO plants, or genetically modified plants, are plants that have been developed in a lab through gene splicing.
When planted, hybrid seeds will give you the result that you see on the package.
However, if you collect seeds from a hybrid plant, the fruit produced by those seeds might give you a very different result.
Here is a great example. Squash plants are mostly open pollinated. Which basically means that they can pollinate each other regardless whether they are different varieties or not.

What Happens When I plant Open Pollinated Plants Next to Each Other
A couple years ago I planted 3 varieties of squash plants. An Asian zucchini plant, a European zucchini plant, and a jack-o-lantern pumpkin. I then took one of my large European zucchini fruits, and threw it in a compost pile in a new flower bed that I am creating.
The next spring, that zucchini fruit produced new plants. The plants looked like a mix between a European zucchini plant, and a pumpkin vine.
The fruit, looked exactly like a European zucchini when young. However, it grew so quick and resembled an oblong pumpkin shape. It was still green and tender, so I harvested it, but I was surprised to say the least, that such a large zucchini could be so tender.
Forward to the fall season, I am overwhelmed with a baby and lots of produce. I harvested the 3 last large “zucchinis”, or so I thought, and put them in a box in my basement until I was able to process them.
Weeks have passed, I go down to check on them, and they have turned an orange pumpkin color, and have become pithy.
Turns out, the European zucchini plant, or that particular flower that produced that particular zucchini fruit, crossed with my pumpkin plant and created a hybrid. Those hybrid seeds produced an oblong orange pumpkin that was sweet, tender, and delicious.
There are many resources that offer hybrid seeds. Hybrid seeds have great and fun varieties. However, it is important to note that if you are looking to harvest seeds from your plants, hybrid plants will give you hybrid seeds. Meaning, you don’t know what you’ll be getting the next time you plant them.
What Are Heirloom Seeds?
Heirloom seeds are what they say they are. They are seeds that have been handed from generation to generation just like an “heirloom”. They are seeds that hold true to their variety. Heirloom seeds also have the same or similar genetics to the plants that they were harvested from.
Heirloom seeds can be easily harvested and replanted, and will often give you the same variety when planted.
Even though heirloom seeds will give you the same variety as the plant that they were collected from, here is an important thing to keep in mind.
How to Properly Harvest Heirloom Seeds
Heirloom seeds are open pollinated. If you plant an heirloom seed variety, next to the same species of plant, but different variety, it is likely that you would end up with hybrid seeds.
So if you are planning to collect heirloom seeds, you want to make sure to plant the same variety of a specie in order to get heirloom seeds.
For example, if you are planting multiple heirloom tomato varieties next to each other, you’ll likely get hybrid seeds, and possibly a completely different variety.
You might want to do some research to see how far apart the different varieties should be from each other before they can cross pollinate, if you are planning on collecting seeds.
Things like corn and grasses in general, can give you a hybrid fruit in the same year you plant them. Because what you’re really harvesting from grassy crops are the seeds.
For example, if you plant ornamental corn close to sweet corn, you will end up with a corn cob that looks like it’s going to a party. You will most likely not have 1 cob of sweet corn unless you’re lucky.
Most cobs will end up with a variety of seeds in them causing them to be super colorful and fun, but that might be something you’re going for.

WHEN SHOULD I START MY SEEDS INDOORS
Here are a few things that you should consider when starting your seeds indoors:
- What growing zone am I in?
- How many weeks should I start my seeds before planting them outside?
- How long does it take each seed from seed starting to maturity?
- What seeds should I start indoors?
- Which seeds should I direct sow?
What Growing Zone Am I in? And is that Important?
Before starting your seeds indoors, it is important to know your frost dates before knowing what growing Zone you are in.
Knowing your growing zone will help you determine how cold it can get in your area. The growing season for most areas extend from spring to fall. Depending on your zone, you might be able to plant in the winter if your temperatures do not go below freezing.
Growing zones unfortunately do not tell you how hot it can get in a certain location. However, a quick search over the internet can help you find out.
Finding out how hot it can get in your climate, can help you determine if a plant is ideal for your location or not.
For example, some plants like it extremely hot in the summer. Our temperatures rarely get over 94 F. So plants that would require higher temperatures, would be more difficult for me to grow in our environment. Unless I use the help of a poly tunnel.
Determining Your First and Last Frost Date
Determining your last and first frost dates on the other hand can help you figure out how long of a growing season you have, and what are the types of plants that you can grown in your area.
The last frost date, is the last day the temperature dips below freezing or even a little above bringing frost with it in the late spring. The first frost date is the first day that frost occurs usually in the fall in most areas.
To find out what is your growing zone, simply type into google your area name and “growing zone” and google will let you know what your growing zone is. Or you can check out this great resource to figure out what growing zone you’re in. Just type in your zip code or address into their search bar, and it will let you know exactly what zone you’re in.
Knowing your frost days is going to help you determine when to start your seeds, and when to plant them out in the garden. Because after all, you do not want the frost to come and kill all your plants and waist your hard work.
How Many Weeks Should I start My Seeds Before Planting them Outside?
To determine when you should start your seeds, you first need to look at your last frost day.
For example, my last frost day is June 10th. Yours might be earlier or later.
Once you find out when is your last frost day, you’ll need to look at your seed packet. On it – it should tell you how many weeks to start them before planting them outside.
If it says 6 to 8 weeks before planting outside, this means that you need to count back 6 or 8 weeks before your last frost day. The first day that is 6 or 8 weeks before the last frost, is when you would start that seed.
Each type of seeds is different. Some need to be planted months before you plant them in the ground, some weeks, some days, and some should be directly sown in the ground.
If you can’t find this information on the seed packet, you might need to look online, or if you have purchased them from a seed website, they might have the information on their website.
How Long Does it Take Each Seed From Seed Starting to Maturity?
This can vary from plant to plant. The seed packets of those specific varieties, or the websites where you have purchased them from should tell you how long it takes those plants to reach full maturity.
Maturity is simply when the plants have produced fruits and are ready to harvest.
It is important to pay attention to how long it takes a plant from seed to full maturity before you purchase it. You want to buy varieties that can live and produce food or flowers for you in your area.
For example, our growing season for tender varieties, extends from June 10 to Sep 21 which are 103 days. If you don’t have ways to extend your growing season, you’ll want to choose varieties that are 100 days, or even better, less than 100.
You can also choose varieties that might be a little more cold hardy; or you can extend your growing season by either starting your seeds a little earlier than recommended, or by covering the plants with hoops and a frost protectant cover during the fall frost season.

What Seeds Should I start Indoors?
Seeds to start indoors would be the seeds that need the warmth to germinate, need an extended growing season, take a long period to germinate, and tender plant varieties.
An example of that would be eggplant seeds, tomato seeds, pepper seeds, asparagus, lisianthus, and so many other varieties.
In general, the seed packets, or the website that you have purchased your seeds from should tell you whether the seeds should be started indoors or direct sown.
Which Seeds Should I Direct Sow?
Seeds that you should direct sow are seeds that either are in the root crop such as carrots, beets, turnips, radishes, and such. Also seeds that are cold hardy or otherwise stated on the packet that best direct sown.
An example of cold hardy plants would be kale, cabbage, lettuce, and such. These are seeds that I never even bother planting indoors. In fact, they do better when direct sown.
As usual, before you start your seeds indoors, always read the seed packets, or the information provided for you on the website which you have purchased them from. Unless you bought them from dollar tree, then good luck, because most of the time those seed packets don’t have any information. However, you might be able to do some research and figure out information about the seeds.
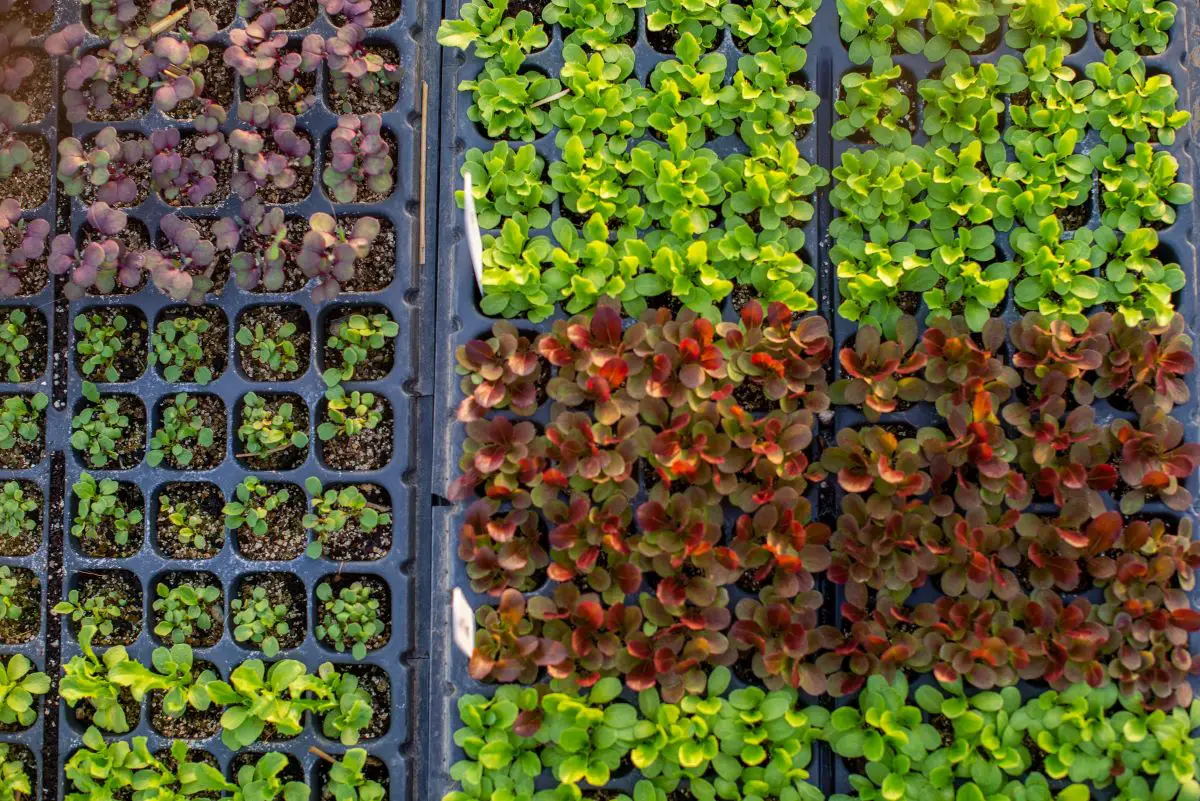
HOW TO PLANT AND WATER SEEDS
To plant your seeds, you first have to moisten your seed starting mix. Place your seed starting mix into a large bowl or bucket, and slowly add warm water to it, a little at a time. Mix with each addition. The mixture should be moist, but not dripping wet. It should not feel like mud. That is too wet.
Place your wet seed starting mix into your seed starting trays. Seed starting trays are basically a bunch of cells that are connected together. The cells or cavities can hold the soil for you. Each cell has a hole at the bottom to allow for good drainage.
Some seed starting trays come with a wicking mat that allows your seedlings to drink when they are thirsty. The wicking mat usually sits on a fixture inside a water tight tray. The tray holds the water, and the mat wicks the water. The plant cells sit directly over the wicking mat allowing them to stay moist.
I love self watering seed starting trays because they make my job so much easier. I do not have to constantly water my seedlings because they can dry out very quickly.
Don’t add water directly to your seed starting tray the moment you plant the seeds. That can cause mold and disease. Instead you’ll want to keep an eye on your seeds, misting them with a water mister, any time you notice that the soil is not as moist. This can be every two hours, depending how dry your climate is.
Once the seeds have germinated, now you can add water to the tray. You can check on it once or twice a week to make sure it is not drying out.
You do not need to place your seeds as soon as you plant them directly under LED lights. However, the moment they germinate, they have to go under those lights.
I like to keep my seed trays next to me in the kitchen or dining room. This allows me to keep an eye on them, and mist them whenever I notice they need some water. Once they germinate, I then put them under the LED lights.
HOW TO HELP SEEDS GERMINATE
Every seed is different just like us. We are all unique and different. Some varieties of seeds require to be warm in order to germinate, and some need to go through a cold period before they can germinate.
Using a Heat Mat to start Seeds
Only use a heat mat if the temperature of your house is too cold for that specific seed variety to germinate.
For example, some seeds require 90F in order to germinate. In that case, you can place a heat mat under the seed starting tray until the plants have germinated. Keep in mind however, that you may need to water them more often, as the heat can cause the soil to dry out.
Once the seeds have germinated, you can remove the heat mat from under them, or keep it for a couple more days until they have gained some strength.
If you do not have a heat mat, you can use a small space heater to keep that area in your house warm.
How to Stratify Seeds
What is stratifying seeds anyway? Stratifying seeds is simply allowing them to go through an extended period of cold temperatures. To do that you can simply place the seeds that need stratification or cold to germinate into the fridge for about 6 to 8 weeks before planting them.
Winter sowing is another method of stratification. You can either direct sow the plants into the ground during the very late fall, allowing them to go through the cold periods; or you can plant them into water jugs in January, or whenever it is cold outside in your area, keep the cap off, and place the jugs outside. You might need to check on them every now and then to make sure that the soil didn’t dry out.
HOW TO PREVENT SEEDS FROM GETTING DANGLY
To prevent seeds from getting dangly you want to make sure that they are getting the proper amount of light. If your seeds are getting dangly, that means that you are not providing them with enough light. To prevent that, you’ll need to first troubleshoot your light situation.
If you are using a window for your light, try choosing a different window that might get more light. However, I am sorry to say, that having your seeds near a window will almost always give you dangly seeds no matter how much you rotate them. Unless you have skylight, then that could sort of offer a “green house” lighting effect.
If you are using LED lights, then perhaps your LED lights are too week, too far from the seedlings, or there isn’t enough of them. You might have one LED light on your plants. Try placing two instead. Or, try purchasing one with high lumens.
You might also want to make sure that you are turning the LED lights long enough for your plants to prevent them from getting dangly. Most people choose to keep their grow lights on for 14 to 16 hours. Unlike direct sunlight, LED lights need to be on the seedlings/plants for a longer period of time.
A great thing that you could do to prevent your seeds from getting dangly after you have troubleshot the light issue, is by placing a gentle oscillating fan to blow directly in their way. This will help strengthen their stems, making them less dangly.
KEEPING AN EYE OUT FOR PESTS AND DISEASES
Pests and diseases can quickly rid your seedlings into nothing, so it is important to keep an eye out for them.
Yellow sticky fly traps can usually help rid of fungus gnats and fruit flies.
Another way to get rid of those pesky pests, is by placing a small bowl of apple cider vinegar with a little bit of dish soap into it. The ACV will attract the gnats and fruit flies, and the dish soap will brake the surface tension allowing the pests to drown.
If you have a problem such as aphids, you can either use a neem oil spray, or an insecticidal soap spray.
If you are facing a fungal disease problem, you might want to use an organic anti fungal spray. Keep the spraying down to a minimal, as these seedlings are indoors after all.
WHEN SHOUD I FERTILIZE MY SEEDLINGS
The moment you should start fertilizing your seedlings is the moment that they get their first true leaves. What are true leaves? True leaves are not the first set of leaves that plants get. They are the second set of leaves that plants get after germinating. The first set is usually smooth and oval or round, and barely has any ridges or character.
True leaves, or the second set of leaves, are the leaves that look like a mature plant’s leaves, or like the leaves that you might see on the packet.
Once true leaves immerge, you are ready to start fertilizing your seedlings in order to give them the best start.
When fertilizing, keep in mind to not over fertilize. Do not give the plants a full doze. Read the label on your fertilizer, and see what they recommend you to use for seedlings. Keep the schedule to once a week, or once every two weeks, but no more, and no less than that.
HOW TO HARDEN SEEDLINGS
You can not just take your seedlings and directly stick them outside in the soil. They have to go through a process known as the hardening process. This process can take weeks sometimes.
To harden your seedlings you will want to start taking them outside for 3o minutes the first day, 1 hour the second day, 1 hour and 30 minutes the third day and so on and so forth. The process can be tedious, but necessary.
Simply each day increase the amount of time they have outside by 30 minutes. Avoid putting them in direct sunlight the first 2 to 3 days.
The hardening process will increase their sun and wind tolerance, giving them a stronger stem, and the ability to withstand the sun’s heat without being scorched.

WHEN SHOULD I POT UP MY SEEDLINGS
To know when you should pot up your seedlings, look at their roots. You can either choose to pot them up early, depending on the variety, or late.
Some seedlings like to be in a confined space. So make sure to do some research on that before you decide to pot them up.
When you notice that the root ball of a seedling is beginning to escape through the draining whole, and the root looks full, you can repot your seedlings into larger pots. You might even be able to pot them earlier than that.
When potting up plants, check the variety to see whether you need to put them deeper or at the same depth that they were planted.
Some seedlings like cosmos and tomatoes, benefit from being potted up deeper because they can produce roots along their stems.
HOW TO PREPARE THE SOIL FOR PLANTING
before you plant anything in the ground, you’ll want to make sure that the soil is ready and hospitable enough to plant your seedlings in.
Here are a few things you could do to make this happen.
- Pull any weeds you see by the roots. You could do that either by hand, or with the help of a shovel. depending on how tough your weeds are. You have to remove the roots in order to stop the weed from coming back.
- Add organic matter by adding compost and manure, or compost and organic fertilizer to your soil. If you decide to add manure, make sure that it has aged first, and is not fresh and hot. Fresh manure kills plants.
Mix the organic matter into the first few inches of the soil that you are planting in. Remember to follow the directions on the bags for all these amendments for best results; especially if you are adding a fertilizer because too much of it can kill the plants. - Cover the surface of the soil with organic straw or hay to prevent weeds from coming up.
- Keep an eye out for weeds and pull them whenever you see them. It is best to pull them as soon as they sprout, before they get strong, and before they seed themselves everywhere in your garden.
- Follow these steps every spring. You might need to amend the soil again during the planting season with an organic fertilizer to keep your plants strong and healthy.
HOW TO PLANT SEEDLINGS IN THE GROUND
Once your seedlings have fully hardened and are able to stay outside for the full day, you are ready to plant them in the ground.
You’ll need to space your seedlings according to the space stated on the seed packet. If you plant them too close to each other, they might crowd each other. Unless you intend on keeping them small.
To plant the seedlings outside, check the variety, and see whether they need to be planted deeper than the original depth that they were planted at or the same depth. Follow the Planting directions and spacing.
Provide the soil with a good compost and organic fertilizer, and plant. Make sure that your seedlings do not dry out especially in the initial planting time. This will cause them to die, or to be extremely weak.
Gently and regularly pull out weeds, from around your plants. This will reduce competition and give your plants the best chance at success.
You might need to fertilize your seedlings every now and then depending on their variety. Happy Gardening!
INTERESTED IN MORE TOPICS? CHECK THESE OUT!
How To Have A Weed Free Garden
Disclosure: Some of the links in this post are “affiliate links”. This means if you click on a link and purchase the item, I will get an affiliate commission. It will not cost you any extra money, but it will help me pay for this website, and it will help me to keep providing you with helpful articles such as this one. I only post links to products that I personally use and love, or to products that I wish I could have, and that could be of value to you. The information that I provide you with, my blog, videos, and many resources are free.
I didn’t know you didn’t need to start your seeds next to light! Thanks for sharing. I particularly liked the DIY grow light system.
Thanks for commenting! I am glad it was helpful to you!