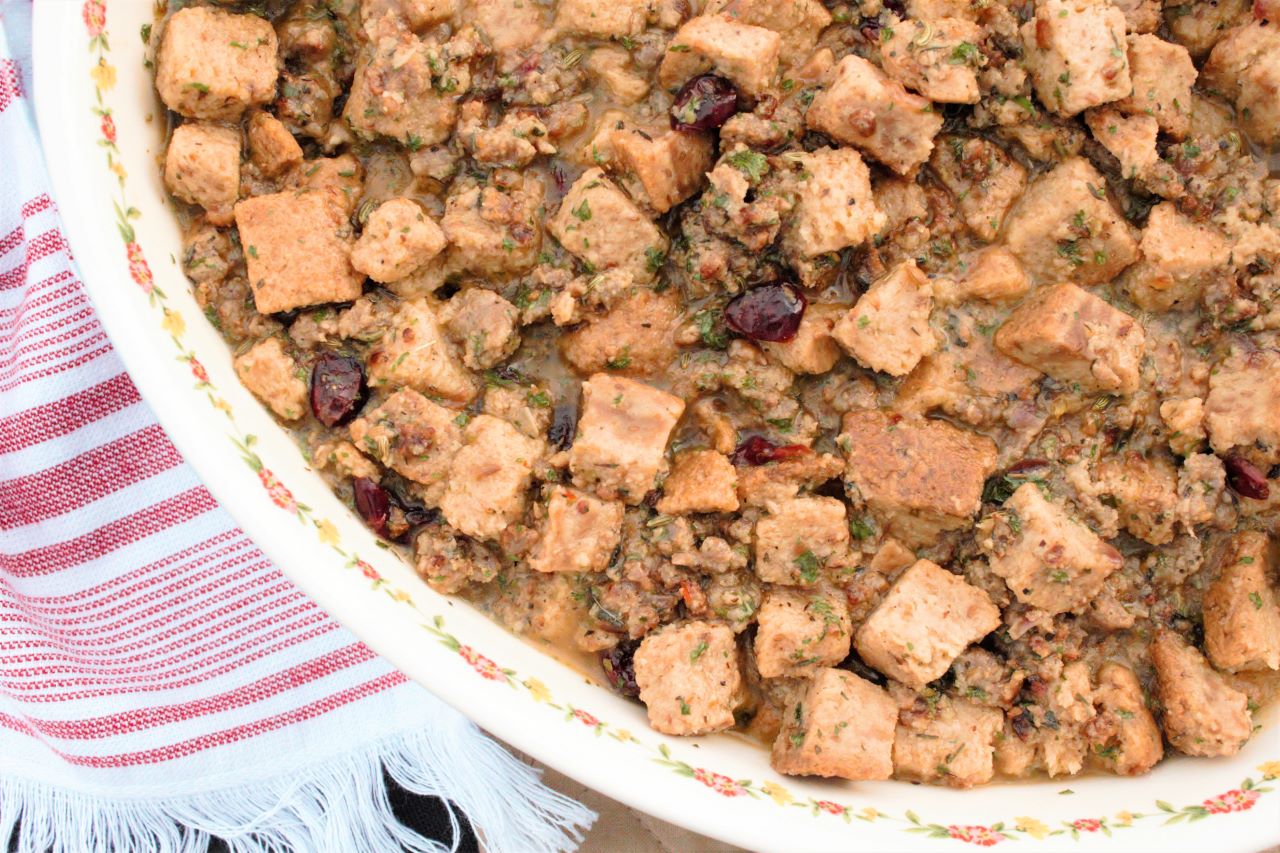
This gluten free stuffing is so rich in flavor. You will find yourself making it over and over again, and not just for the holiday season. Crispy edges on the outside and soft and delicious on the inside. Using this homemade gluten free sandwich bread with sausages, dried cranberries, seasoning such as sage, thyme, and parsley, and loads of butter makes this the best gluten
Disclosure: This post contains affiliate links. As an Amazon Associate I earn from qualifying purchases.free stuffing.
INGREDIENTS TO MAKE GLUTEN FREE STUFFING
- Homemade Gluten Free Sandwich Bread If you want the best stuffing ever, you need to use this homemade gluten free sandwich bread recipe. Believe me, you will get the best results, the best and most tasting stuffing that you’ve ever had, and will ever have.
I cannot guarantee that you will have good stuffing if you use store bought bread. However, I do get it, the holidays tend to be hectic.
But, If you are using store bought bread use a whole loaf of gluten free sandwich bread because they are a lot smaller than the loaf of bread you will get using my recipe.
I seriously believe that how good your stuffing will turn out is anchored upon how good the bread that you are using to make it with is. So if you are using a prepackaged bread, try using a good quality gluten free bread. Even if it were a little more pricy. - Sausage meat you will need to brown it, and drain the fat.
- A red onion, red onions are a little spicier than yellow onions. They add a bit more flavor to the stuffing than a regular yellow onion would. If you’d like, you can also use a shallot in it’s place.
- Minced garlic
- Large eggs the eggs are necessary to thicken the stuffing by creating a pudding.
Seasoning
- Dried parsley the seasoning is everything in this recipe. It is a part of what makes this gluten free stuffing so good.
- Dried sage leaves crushed I am using dried sage leaves, and mostly dried seasoning because it is intense in flavor, and it tends to be a lot cheaper than the fresh stuff during this time of the year.
However, you can choose to use fresh sage leaves, parsley, basil, thyme, and rosemary. The flavor will change slightly. I also personally prefer the flavor of the dried seasoning in this gluten free recipe. - Dried basil
- Dried oregano
- A little Dried thyme
- Some Dried rosemary
- Dried celery I am using dried just because I found it to be easier and quicker, but you can also use fresh if you’d like.
- And some Dried cranberries they will impart a hint of sweetness, and that delicious cranberry flavor to the stuffing giving you that holiday feel.
- Freshly crushed black pepper
- Salt
The Liquids
- Melted butter we will be using lots of melted butter. This is what will give this stuffing it’s richness, creaminess, and the crispiness around the edges.
You can choose to use a dairy free option butter as well. This time, I chose to go with the full on dairy butter. - Chicken broth I love using homemade chicken broth because first it tastes so much better, second it is a lot healthier. hopefully I will be sharing a few chicken broth recipes with you in the near future.
- Extra virgin Olive oil my go to oil. I love using extra virgin olive oil in almost anything. It has such a nice flavor and scent.
UTENSILS YOU’LL NEED
- Cutting board
- Sharp knife
- Ceramic baking dish
- Large bowl
- Frying pan
- Measuring Spoons
- Measuring cups
- Whisk
- Mixing spoon
- Sheet pan
- Small bowl
- Aluminum foil
PREPARING THE GLUTEN FREE STUFFING
How to Prepare Stuffing
You will need to cut up the bread into cubes the night before and lay it out onto the cutting board or the sheet pan to dry.
The next morning, you will bake the bread on a low temp of 250 for 1 hour to dry it out.
These two steps are very important in order to prevent the bread from getting too soggy and sticky when you make the stuffing.
Another important point to mention is, when all the moisture is evaporated out of the bread, now it can absorb all the other flavors.
This will make the stuffing super rich in flavor because the only moisture that’s there is the one from all the flavors that you have added.
Some of the moisture that you will be adding to the stuffing would include chicken broth, and butter. The flavor from these two ingredients alone is amazing and it is what you want the bread to absorb.

Adding Flavor
Once the bread is fully dried, you will want it to sit in some of the chicken broth for several minutes. This allows it to absorb all the moisture that it can, and all the good flavor from the chicken broth, especially if you use homemade chicken broth.
Once the bread has absorbed the part of the chicken broth that you’ve previously added to it, now you can add the rest of the flavor.
You will add all the seasonings of course. Mix in the eggs with the remaining chicken broth and add that in, mix all that in, and then add in the melted butter.
The smell will be heavenly, but wait until you bake it. It will even smell better.
You might need to adjust the amount of chicken broth that you will be adding depending on the amount of bread that you are adding and how moist it is.
Baking The Gluten Free Stuffing
The first part of baking the stuffing will require covering it with aluminum foil. You will need to do this in order to prevent the stuffing from drying out before it turns into a “pudding”.
After about 40 minutes of being baked while “under cover”, you will need to uncover the stuffing and continue baking it. Uncovering it will allow the edges and the top to crisp up giving you the most perfect gluten free stuffing.
After being fully baked, the stuffing should have crispy edges, and a firm center. It should not be runny.
LOOKING FOR MORE GLUTEN FREE RECIPES?
Check out this gluten free cookbook with the 10 essential gluten free recipes for your gluten free life.
CHECK OUT MORE GLUTEN FREE RECIPES
18 Gluten Free Thanksgiving Recipes
Gluten Free Chocolate Chip Cookies

Gluten Free Stuffing
Ingredients
Equipment
Method
- Cut up bread into 1-inch cubes, lay it out on a sheet pan, and leave it out to dry overnight.
- Preheat oven to 250 F
- Bake bread for 1 hour.
- Preheat oven to 350 F
- Place the cubes bread into a large bowl, add ½ of the chicken broth in with the bread and mix it in. Allow the bread to sit in the broth for 10 to 15 minutes, stirring it every now and then.
- Meanwhile, sauté the onions and the garlic in 3 tablespoons olive oil until translucent.
- Add the sautéed onions and garlic, browned sausages, dried parsley, crushed sage leaves, dried basil, dried oregano, dried thyme, dried rosemary, dried celery, dried cranberries, black pepper, and salt to the bread mixture and mix well.
- In a small bowl, combine the eggs and remaining broth and whisk until well combined. Add this mixture to the bread mixture.
- Add the melted butter, mix until well combined.
- Grease a 9 x 13 ceramic baking dish, place the stuffing into the baking dish, and level it out. Cover it with foil, and bake for 45 minutes. Uncover and bake for 15 to 30 minutes or until set and no longer “liquidy”.
- Allow it to rest for 10 to 15 minutes and serve. Delicious!
Notes
You can find the bread recipe on PeacefulLivingNH.com blog by searching gluten free sandwich bread
Disclosure: Some of the links in this post are “affiliate links”. This means if you click on a link and purchase the item, I will get an affiliate commission. It will not cost you any extra money, but it will help me pay for this website, and it will help me to keep providing you with helpful articles such as this one. I only post links to products that I personally use and love, or to products that I wish I could have, and that could be of value to you. The information that I provide you with, my blog, videos, and many resources are free.


Be the first to reply