
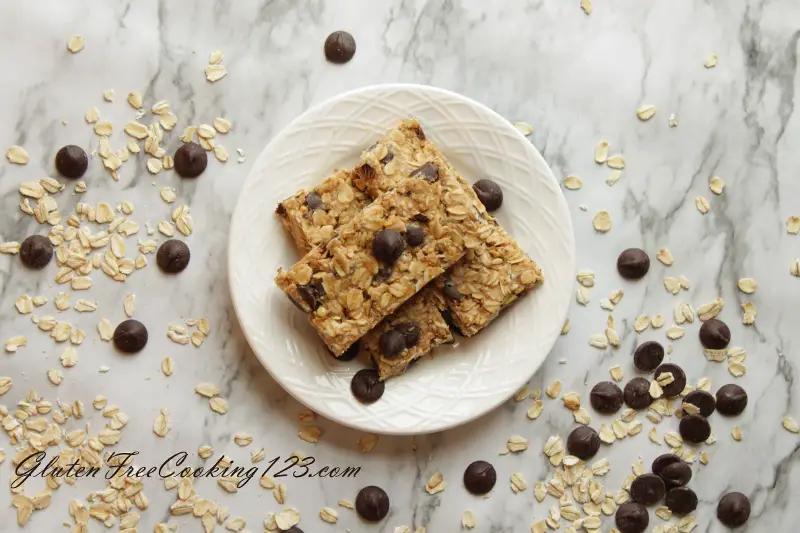
This Granola Bars recipe is a staple at my house. My kids always beg me to make it. These granola bars are a healthier alternative than most store-bought snacks, and they take less than 10 minutes to prepare. You can’t beat that!
Jump to RecipeINGREDIENTS FOR THIS GRANOLA BARS RECIPE
- Honey will add a great flavor, is healthier than most options, and it will allow your granola bars to stick together better than most alternatives. Plus it is 100% natural if you get raw honey.
- Crunchy peanut butter will also help in keeping the bars stuck together. It will essentially act like glue. Crunchy peanut butter will also add beneficial proteins and the needed “crunch” to our granola bars recipe.
- Vanilla extract will add some extra nice flavor.
- Gluten-free rolled oats this will be the base of your granola bars. You’ll want to make sure to use gluten free oats. If you follow my affiliate link, you’ll be sure to get the gluten free version.
Even though oats are naturally gluten free, often times they are processed in a factory that also processes gluten filled grains like wheat and barley. When you purchase your oats, you’ll want to make sure that the packaging says “gluten free” on it. - Gluten-free rice crisps cereal this ingredient is optional. You can substitute the same amount with rolled oats. But, if you want to make these bars a little more fun for your kiddos, you can use the rice crisps cereal.
Also make sure it states “gluten free” on it. Most rice crisps cereal have barley, or barley malt in them. This ingredient is NOT gluten free. - Unsweetened shredded Coconut will add a nice flavor and some extra nutrition and health benefits.
- Semisweet chocolate (or dark chocolate) morsels will add a wonderful flavor, and texture. If you want, you could omit the chocolate and replace them with dried fruits.
UTENSILS
- Large wooden spoon
- Large microwavable bowl
- Measuring cups
- Measuring spoons
- Spatula
- Baking spray
- Cookie sheet
- Aluminum foil
- Plastic wrap
Directions
For more videos like this, subscribe to my YouTube channel.
GRANOLA BARS
I love these granola bars. My biggest challenge is restricting myself when it comes to eating them.
They make a great snack especially on a busy day, and you are guaranteed that you and your kids are going to love them. If you don’t have kids, you will be delighted to have them all for yourself, or you could “maybe” share with a friend.
They are a great source of energy when you are on the go. Full of protein, fiber, and a good source of sugar to provide you with energy.
HOW TO MAKE THIS GRANOLA BARS RECIPE
Making these granola bars is so easy and so versatile. It is all up to your imagination!
Place 1 cup of peanut butter in a large microwavable bowl. Heat it in the microwave for one to two minutes or until soft and slightly melted.
If you don’t like to use the microwave, you can melt it in a large pot, and do all the mixing in the pot.
You will want to work quick now because you don’t want the peanut butter to cool before you are done making these bars.
Add the half a cup of honey and the 1 teaspoon vanilla extract to the melted peanut butter. Mix well until everything is well combined.
If you notice that your mixture is slightly thickening and does not look so melted, you can pop it back in the microwave for another 30 second and stir it as soon as it comes out.
Addding the dry ingredients to the granola bars
This really is up to you what you add in here.
Sometimes I do add in the rice crisps and sometimes I don’t. If I want a healthier version I just double the amount of rolled oats which is personally my favorite thing to do. But, for the occasional treat that I might want to give to my kids, I might add in the rice crisps cereal instead.
If You do not have crunchy peanut butter, you can always process about a 1/4 cup of whatever nuts you like and add it in to the mixture. That is what I did the last time I made this recipe, and you can watch me make it in the video that is listed above.
If you are allergic to peanuts, you could probably use almond butter, or whatever type of sticky butter you choose. Just make sure that it does become sticky after it cools down, and will act as a binding agent for your ingredients.
After you add in the rolled oats, rice crisps, and perhaps nuts, you can add in the chocolate morsels, or dried fruits if you so choose to, and the coconut shreds.
What else can I add to my granola bars?
You could also add part chocolate part dried fruits which is what I do sometimes.
You can also add some seeds, such as sesame seeds, flaxseed, and so on.
Using a wooden spoon, mix everything together until well combined.
You shouldn’t see any dry pieces of oats or cereal. Everything should be well coated with the peanut butter and honey mixture. You should also begin to notice the mixture clinging to itself.
SHAPING THE GRANOLA BARS
Line a cookies sheet with foil, shiny side up. If the granola touches the mat side of the foil, it will stick to it, and you will find yourself painstakingly removing pieces of foil off your precious granola bars. So make sure it’s shiny side up!
Using a rubber spatula, scrape the mixture into a baking pan or a cookie sheet.
Spread the mixture into the pan to your desired thickness.
You can do so first using the rubber spatula, and then spray your hands with some of the cooking spray; or you can also coat them with some coconut oil. The key here is to not have the granola mixture stick to your hands.
Press using the palm of your hands to flatten the granola mixture into the pan. Make sure to have it evenly spread and leveled. You’ll also want to make sure that you do not have any gaps between the granola mixture otherwise, when you do cut the bars, they will fall apart.
Using a cling wrap, cover the granola bars. Just make sure that the plastic wrap does not touch them, otherwise it could stick to them. Or, if you are sure that it is going to touch them, you could spray the plastic wrap with some cooking spray on the side that will touch the granola bars. This will prevent it from sticking.
CHILL BEFORE YOU CUT
Refrigerate for 1 to 2 hours and then cut into bars.
You really need to have some patience for this step. As much as you’ll want to dig in into the bars, it is important to let them chill before you cut them.
The longer they chill the more likely they will stay together.
TROUBLESHOOTING YOUR GRANOLA BARS RECIPE
An important note that I want to add in here is that you do not want to add too many extra stuff into the mixture; otherwise it will not hold itself together very well.
However, if you do want to add more things over and above as an addition to what I have listed, you can add in an extra tablespoon of peanut butter and a half tablespoon of honey or as much as necessary to hold your mixture together.
Just remember the more things you add, the drier the mixture will become, and you will have to compensate for that.
Another thing that I noticed is that if the climate seems too dry, the granola bars tend to be drier than usual.
In that case, you can also add in a little bit of peanut butter and honey to fix this problem. This problem can also be fixed by leaving them in the fridge overnight before you begin using them. As the condensation from the fridge onto the cling wrap will cause the granola bars to become a little more moist.
HOW TO STORE HOMEMADE GRANOLA BARS
You can store them covered in the pan in the fridge, or you can individually wrap them with some cling wrap or aluminum foil, and store them in a container or a resealable bag in the fridge.

Granola Bars Recipe
Ingredients
Equipment
Method
- Place 1 cup of Peanut butter in a large microwavable bowl. Heat in microwave for one to two minutes or until soft and slightly melted.
- Add ½ a cup of honey and 1 tsp vanilla extract to the peanut butter. Mix well until well combined.
- To the peanut butter and honey mixture, add the 1 ½ cups of rice crisps, 1 ½ cups rolled oats, ½ a cup of unsweetened shredded coconuts, and the 1 cup of chocolate. Using a wooden spoon, mix until well combined.
- Using a spatula, scrape the mixture into the cookie sheet lined with foil.
- Spray your clean palms with the cooking spray. Rub your palms together, and gently press on the mixture with your oiled hands to spread it evenly into the pan in order to create a ½ or a ¼ inch thick granola sheet.
- Cover the granola sheet with a plastic wrap.
- Refrigerate for one hour. Cut into even bars (whatever size you like) and enjoy~
Video
Notes
Disclosure: Some of the links in this post are “affiliate links”. This means if you click on a link and purchase the item, I will get an affiliate commission. It will not cost you any extra money, but it will help me pay for this website, and it will help me to keep providing you with helpful articles such as this one. I only post links to products that I personally use and love, or to products that I wish I could have, and that could be of value to you. The information that I provide you with, my blog, videos, and many resources are free.
Be the first to reply