
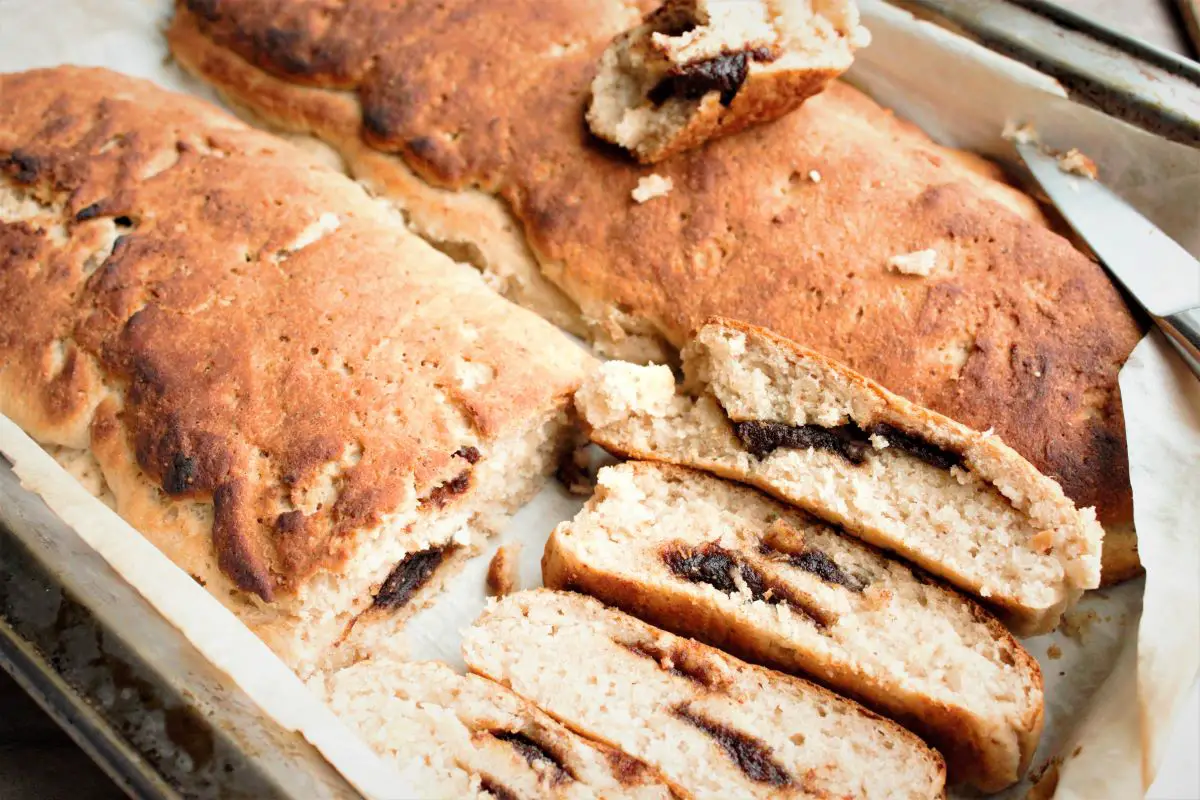
This gluten free brioche bread is filled with a date paste filling that is flavored with aromatic rose and orange blossom water. The bread itself is so heavenly. It is soft. It’s fluffy. It’s slightly sweet. It’s everything you’ve ever dreamed of having in a gluten free brioche bread.
Jump to RecipeMY HISTORY WITH DATE BRIOCHE BREAD
This brioche bread in particular holds such a beautiful memory in my life. The first time I remember having it was when I was at the market in Sidon with my parents.
At the time, most people sold their fruits, vegetables, breads, desserts, clothing, and whatever you could think of on carts. It gave them the ability to take their portable stores into the area that has the most customers, and the most profit.
I was about nine years old or so. We were surrounded by these portable stores, and one of them was a cart that sold bread. All sorts of bread. My dad looked at me with a smile, he stopped next to that cart, and bought the most delicious brioche bread, and handed it to me. I was in aw.
I did not know what I was looking at. It was a very beautiful bread. Golden brown, sprinkled with a bit of sesame seeds, and shaped like a flour.
I took a small bite, and it sent me into a wonderous world. It was soft and fluffy with a hint of sweetness. I took another bite, and I had a wonderful surprise of an aromatic date paste that was surrounded by that soft and fluffy, heavenly bread.
After that first time of having this wonderful date brioche bread, I often would ask my father to bring me some on his way back home from work.
This Gluten free date brioche bread is, I can say, a very successful attempt at trying to recreate that wonderful childhood memory.
This gluten free brioche bread recipe has accomplished all my hopes and dreams at being able to have my favorite childhood date brioche bread. One that I can eat and still feel good afterward. And one that I unfortunately, have to hide from myself, otherwise I will keep eating it. It is that good!
HIGHLIGHTED INGREDIENTS
- Brown rice flour adds a wonderful flavor and texture to the bread.
- Cornstarch Absorbs a lot of liquid and it adds the soft texture to the bread.
- Psyllium husk allows the bread to rise without loosing its form.
- Coconut flour not only adds a great flavor, but it also adds a wonderful texture. It takes the bread from sticky and sort of gummy, to heavenly soft and fluffy.
- Mahlab which is the ground up seed of a wild cherry tree, adds a wonderful aromatic flavor to the bread. I am telling you right now, the bread will not be the same without it. It would not taste as great as it does if you do not use it. So I highly recommend using it.
- Xanthan gum Allows the bread to hold its structure during the baking time. If you do not use xanthan gum, the bread will crack and deflate during the baking process.
PREPARING THE DOUGH
The first step of preparing the dough is proofing the yeast, but if you know me by now, you’ll know that I don’t proof my yeast. I see this step as a complete waist of my precious time.
However, if you are not sure whether you yeast is dead or alive, you’ll want to proof it. To do so, mix the yeast with the lukewarm water that is mentioned in the recipe, and allow it to proof in a warm place for 10 minutes.
if after the 10 minutes have passed, you see froth forming at the surface of the mixture, then your yeast is active and ready to be used. If you do not see any activity on the surface, no froth, no bubbles, then your yeast is dead, and you obviously need new yeast.
Once you know whether your yeast is active or not, you can then proceed with preparing the dry mixture.
for the dry mixture, you’ll want to mix in all the dry ingredients together including the brown sugar. You can mix it using a whisk to ensure equal distribution.
Once that’s done, you can then add in the room temperature butter. Start by squishing the butter into the dry mixture, and braking it into small chunks.
Once it’s in small chunks, you can then rub the mixture in between your hands in order to distribute the butter equally amongst the dry mixture. When you’re done, the mixture should resemble bread crumbs.
Add in the yeast mixture, and apple cider vinegar. You can mix using either a wooden spoon or your hands. I like to mix using my hands because this allows me to feel the texture of the dough. It also ensures that no dry crumbs remain because I can sense it using my hands.
when your done mixing, the dough should be very sticky.
CHILLING THE DOUGH
After you have mixed the dough, you’ll need to cover it with plastic wrap to prevent it from drying out.
You’ll then need to place it into the fridge to allow it to chill for an hour or two.
chilling the dough is an essential step because this is what will give you the ability to shape it. Otherwise the dough will be too sticky, and too flimsy to handle.
chilling the dough also gives it rigidity that otherwise it would not have making shaping the dough almost impossible.
PREPARING THE DATE FILLING
To preparer the date filling, you’ll need to melt the butter first, and allow it to cool until it is cool enough to handle.
Measure the date paste, and the rose water and orange blossom water.
Add in the melted cooled butter, and mix using your hands until it forms a smooth dough.
Cover it with plastic wrap until it is ready to be used.
SHAPING THE BREAD
To shape the bread, you’ll need a lot of vegetable or coconut oil to prevent the dough and date paste from sticking to your hands And forming a complete mess. So have a bowl on hand filled with the oil of your choice.
Oil your hands super well and divide the dough into four equal portions.
Oil your hands again and divide the prepared date filling into 4 equal portions.
Line a baking sheet with parchment paper. Preferably a deep dish pan or a roasting pan to allow the bread room for expansion once it’s covered.

Take one portion of the dough and spread it into a rectangle that is 1/2 inch in thickness and 3 and a half inch in width. You can adjust the length of the bread to fit in your pan.
Continue to oil your hands with each step.
Take one portion of the date filling and roll it into a rope of the same length of the rectangle. Lay it on one side of the rectangle, the long way.
Take another portion of date filling and repeat the same step, except this time, lay it n the side opposite of the first rope of date filling that you have laid over the rectangle of brioche.
Press the two ropes flat into the rectangle.
Now take another portion of dough and form the same size rectangle as the first rectangle of brioche. Lift it carefully, and lay it over the first rectangle that has the date filling, sandwhiching the date filling in between the two rectangles.

Place this date brioche loaf onto one side of the pan, leaving enough space for the next loaf.
repeat these same steps to form another loaf of brioche.
Lay the second loaf of brioche onto the pan adjacent to the first loaf, leaving some space in between.
Cover With plastic wrap, and allow the bread to rise for two to three hours.
BAKING THE BREAD
Preheat the oven to 450 F.
If you want to place sesame seeds on tp of the bread, you can prepare an egg wash by mixing one egg and 1 tablespoon water. Brush the top of the brioche loaves with the egg wash, and sprinkle with toasted sesame seeds.
To bake the brioche loaves, place the pan on the center rack of the preheated oven, and allow it to bake for 25 to 30 minutes, or until fully browned on top, and if a toothpick inserted, it comes out clean.
Allow the bread to cool completely before serving for the best flavor and texture.
MORE DELICIOUS GLUTEN FREE RECIPES
Gluten Free Zalabia (Mediterranean Vegan And Nut Free Donuts)
Gluten Free Sourdough Bread Rolls
Vegan And Nut Free Gluten Free Soft Pretzels
Gluten Free Double Chocolate Mug Cake


Gluten Free Brioche Bread With Date Filling
Ingredients
Equipment
Method
- Into a small bowl, mix in the yeast with the lukewarm water to check if the yeast is active. Set this mixture aside in a warm place for 10 minutes. After the 10 minutes have passed check to see if the mixture has become frothy on the surface. If so, then the yeast is active and ready to be used. If not, then the yeast is no longer alive and it can no longer be used.
- Meanwhile, add the dry ingredients into a large bowl, and mix using a whisk.
- Add the room temperature butter to the dry mixture. Work on incorporating the butter into the dry mixture, by rubbing the butter into the dry mixture using your hands. The mixture should resemble bread crumbs when the butter is fully incorporated.
- Into the dry mixture, add in the yeast mixture, and the apple cider vinegar.
- Mix either using your hands or a wooden spoon. Continue to mix until everything is well incorporated. The mixture should be sticky.
- Cover the bowl with some plastic wrap, and place it into the fridge for 1 hour.
- Meanwhile, prepare the date filling by melting 25 g of butter. Allow the butter to cool, the mix it in with the date paste and rose water until fully incorporated.
- Line a deep-dish pan with some parchment paper.
- Fill a small bowl with some vegetable oil. Cover your hands with the oil to prevent the dough from sticking to it.
- Divide the dough into four equal parts.
- Divide the date paste into four equal parts.
- Take one part of the dough and press it into a rectangular form that is ½ inch in thickness and 3 ½ inch in width.
- Take one part of the date paste and roll it into a rope that is of the same length as the rectangle that you have formed. Take the date rope that you have formed and lay it on one side of the rectangle, the long way. Press it into the rectangle. Repeat this step again, and lay the date paste rope on the opposite side of the first date rope that you have placed leaving some space in between. Press the date paste in.
- Take another portion of dough, and press it into a rectangle that is of the same size as the first rectangle which you have made. Carefully lift it, and lay it directly over the first rectangle that has the date filling. This is the first loaf of brioche.
- Repeat steps 12 through 14 to form the second loaf of brioche.
- Cover the loaves with plastic wrap. Place in a warm place and allow them to rise for 2 to 3 hours.
- Preheat oven to 450 F.
- Uncover the date brioche, and place it onto the center rack of the preheated oven. Allow it to bake for 25 to 30 minutes or until the top is fully browned and when you insert a toothpick into the bread, it comes out clean.
- Allow the bread to come to room temperature before serving.
Notes
Disclosure: Some of the links in this post are “affiliate links”. This means if you click on a link and purchase the item, I will get an affiliate commission. It will not cost you any extra money, but it will help me pay for this website, and it will help me to keep providing you with helpful articles such as this one. I only post links to products that I personally use and love, or to products that I wish I could have, and that could be of value to you. The information that I provide you with, my blog, videos, and many resources are free.
Be the first to reply