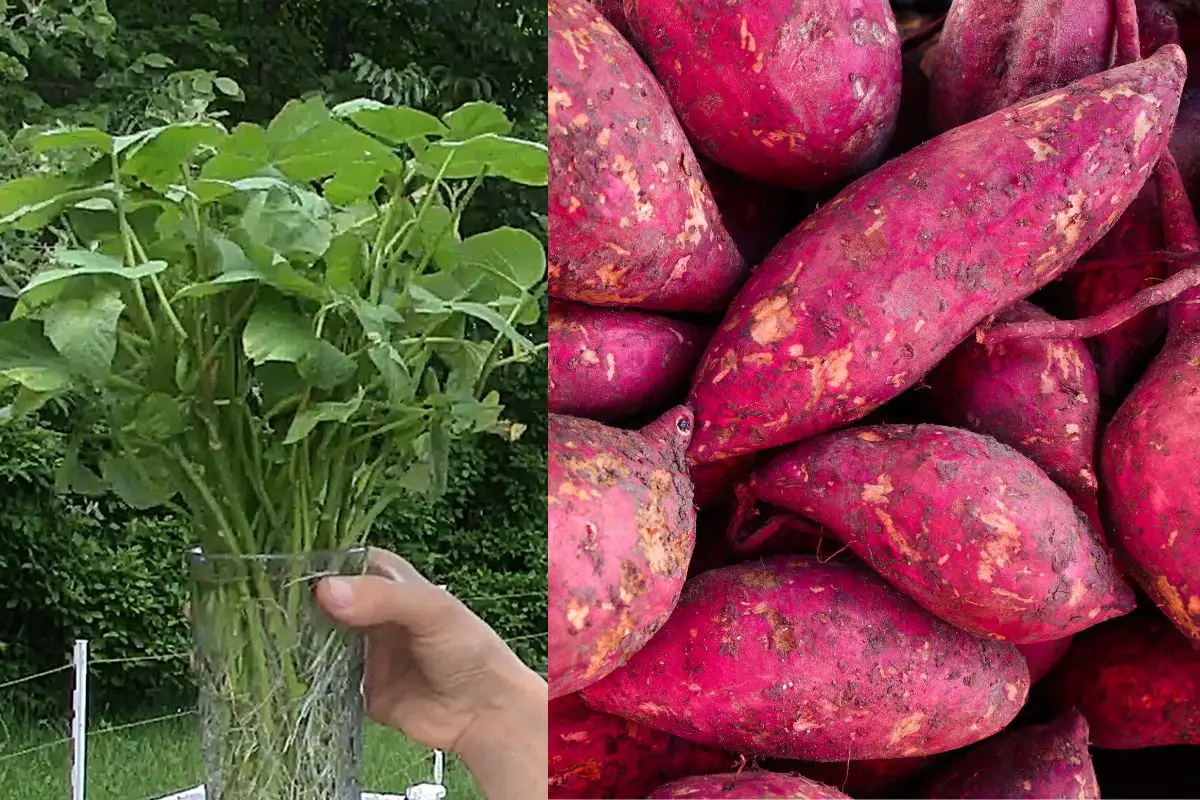
Learn how to grow sweet potatoes in this step by step guide. From starting sweet potato slips, planting them in the ground, to harvesting an amazing yield. Wondering how to grow large sweet potato tubers? This guide will also teach you how.
How to Start Your Own Sweet Potato Slips
Starting sweet potato slips can be done in two different methods. The water method, and the soil method.
How To Tell Which Way Is the Top and Which Way Is the Bottom
Sweet potatoes have two ends, the root end and the top. Most people suggest that the root end is the pointier side, and the top end is the fat side. I have personally found that this is not always the case. Sometimes, you might end up with the root end on the fat side!

There are many indicators to where is the root end. Although the pointy side works 90% of the time, you might be one of the unlucky 10% that got their root end on the fat side.
Here are some indicators that can help you identify the root end from the top end.


- The root end tip tends to be on the darker side while the top end tip is on the creamy white side.
- The top end tip will generally have a woodier feel than the root end.
- You will be able to see dark, almost black, dots on the outer perimeter of the the root end tip. The top end will have lighter color dots around the perimeter of its tip.
- You might notice more mark lines on the root end side of the sweet potato.
- The root end might also have some really thin roots, that are almost hair like, sticking out of the mark lines. It is possible to see that also on the top end, but you might see more on the root end.
- You might also notice some “root like” features sticking out of the sweet potatoes. Those are usually covered with skin, and they are the part of the sweet potato that connected either to the plant, or to another sweet potato. There is a chance that they might be a root, but not necessarily.


Starting Sweet Potato Slips Using Water
To start Sweet potato slips in water, Fill a cup with water, and insert the rooting end into the water. Keep the top end above the water. The top end is where the sweet potato slips will sprout from.

To support the sweet potato and prevent it from completely sinking into the cup, you can insert a few tooth picks into the sweet potato and level them with the cup. The tooth picks will provide the support the sweet potato needs and prevent it from sinking.

Another method that you can implement is to place the sweet potato sideways into a bowl of water.
The water should be covering half of the sweet potato, and the other half should be above the water. This is something that my husband suggested, but I haven’t tried it yet. However, I believe it should work.
You can follow the second method if you are still not sure which way is the root end and which way is the top end.
Place the sweet potatoes in a warm and humid environment, like your kitchen. This will quicken the process of sprouting.
You will have to change the water every few days. If you notice the water color is starting to change, this should be a good indication that you need to dump the old water, and refill with new fresh water.
Allow the slips to develop until they are about ten to twelve inches before snipping them off.
Starting Sweet Potato Slips Using Soil
Honestly, this is the easiest method and the most reliant method to starting sweet potato slips, especially if you are not sure which way is the root end and which way is the top.
To apply this method,
- simply place some potting soil into an aluminum foil pan. The pan should be about 2 to 3 inches deep.
- Moisten the soil until it is moist, but not dripping wet. The soil should hold together when you hold a fist of it in your hand, but it should also crumble easily.
- Place your sweet potato sideways into the pan of soil, burying it half way through.
- Place the pan in warm and humid environment, and keep the soil moist by watering it regularly.
- Once the sweet potato sprouts, you will need to place it in a place with ample sunlight to allow the slips to photosynthesize.
- Allow the slips to grow to about ten to twelve inches before snipping them off.
Rooting the Slips

Once the sweet potato slips have developed to about ten to 12 inches long, and they have mature and healthy looking leaves, they are ready to be separated from the sweet potato.
To separate the slips from the sweet potato, either snip the end that is connected to the sweet potato off of the potato by using scissors, or by separating it by hand.
Fill a tall glass with water. Remove any leaves at the bottom of the slip and leave the rest that are on the top. Place the slips into the water, and allow them to develop roots for a few weeks.
If you have many slips, you can separate them into several glasses of water to prevent their roots from tangling.
You will have to change the water a few times. Once the slips begin developing roots, they will absorb more water. So you will have to refill the cups one to two times a day to prevent the roots from drying out.
How Many Sweet Potatoes Do I Get From One Plant
Each sweet potato plant can give you between 3 to 5 sweet potatoes. Sweet potatoes develop tubers along each leaf node. So if you want to get more tubers, you can remove some of the bottom leaves, leaving a few at the top, and burry the slips deep into the ground.
How to Get More Tubers Out of Your Sweet Potato Slips
to get more tubers,
- Allow your slips to grow even longer than 12 inches, and stick them into a deep vase that’s filled with water to allow them to set roots.
- Once the roots are developed, you can remove most of the leaves, leaving a few at the top, about five leaves.
- Bury the sweet potato plant horizontally into the ground while allowing the leaves and any part of the plant that is setting leaves to stick out of the ground. This method will give you the most tubers out of one plant.
How to Grow Large Sweet Potato Tubers
Sweet potatoes are a root vegetable. Although they have leaves, and they have a lot of them, the main focus of the plant should be directed toward setting tubers instead of leaves.
The dimension of the tubers depend on the type of nutrients, and the amount of water that you are giving your plant.
The main nutrients that any plant require are nitrogen, phosphorus and potassium, also known as NPK. The N stands for Nitrogen, the P stands for Phosphorus, and the K stands for Potassium.
Nitrogen is responsible for the leafy growth of the plant. Although sweet potatoes require some nitrogen for their leaves to grow, and look green and lush, they don’t need as much nitrogen as you would expect.
A good fertilizer to give your sweet potatoes would be an organic fertilizer that is higher on the phosphorus and potassium rather than the nitrogen.
To encourage root development and cell health even more, you can provide them with organic bone meal. Bone meal is high on phosphorus and low on nitrogen. It also contains a good source of calcium.
Phosphorus will promote root growth, while calcium will provide your tubers with a good cell structure keeping your tubers firm and less likely to rot, and make your plant in general more disease resistant.
Applying a second dose of organic bone meal and organic fertilizer midway throughout the growing season, will also help your tubers to grow bigger and healthier.
Another important element to getting large tubers is watering. Sweet potatoes are loaded with starches, but they are also loaded with water. Keeping your soil moist, and preventing it from drying out will ensure that your tubers will grow large.
However, do not over water, as that can cause the tubers to rot. Basically, you do not want to have muddy soil.

What PH Level Do Sweet Potatoes Prefer
Sweet potatoes prefer a slightly acidic soil of 5.5 to 6.5. PH. You can find more information about this on Alcorn State University Extension.
Having the proper acidity level is very important. The proper acidity level will help the plant absorb the nutrients that it needs; therefore allowing it to be more disease resistance. a plant that is lacking in nutrients will have a more difficult time resisting insects and diseases.
if you have a high PH, or a more alkaline soil of a PH that is higher than 7, or maybe even slightly lower than 7, you might notice signs of chloroses, and a stunted plant.
signs of chloroses are yellowing of the new leaves with dark, prominent green veins, and stunted growth.
How Can You Tell that a Sweet Potato is Ready to be Harvested
Most sweet potato plants take about 120 days to maturity. When the plant sets fruits, that is usually a sign that it is beginning to set its tubers. The tubers will then begin to mature after that period.
Once the tubers are mature, the leaves will begin to yellow and crisp up if you live in a warm environment. However, if you live in a cold environment, You will get frost damage on your leaves.
If you planted them early, then you can pull the tubers out right after frost.
If you planted them late, and they did not have the chance to develop their roots properly, you can cover the plants with a frost protecting cover to allow them to continue to develop their tubers until they are ready to harvest.
Once the sweet potatoes are ready you can dig them up using a Spading fork, and get them ready for storage.

How to Store Sweet Potatoes Long Term
To get the sweet potatoes ready for storage, you have to allow them to go through a curing process first.
To cure the sweet potatoes, place them on a piece of cardboard in a warm environment. Keep them away from direct sunlight, and do not allow the tubers to touch each other. I usually cure my sweet potatoes on my dining room floor on a piece of craft paper or cardboard.
The curing process should take about 1 to 2 weeks. This process will allow the tubers to develop a second skin which will then prevent them from easily bruising. Before curing, the skin can easily come off if you simply rub it.
Curing will also allow the sugars to develop in your sweet potatoes making them taste even sweeter.
Once they are done curing, you can brush off any excess dirt using a vegetable scrub.
To store the sweet potatoes, you can place them in a basket with plenty of airflow, but do not allow the potatoes to touch each other. If they touch each other, they have the potential to rot quiker.
Sweet potatoes like to be stored at temperatures between 50 to 60 F, and relative humidity of 60 to 70%. So a basement should be a good place to store them. Keep them away from light to prevent sprouting.
At these temperatures and humidity levels, your sweet potatoes should last for up to 6 months.
Get Your Free Gluten-Free eBook Cookbook Today!
Pin This Post!

More Gardening and Recipe Related Topics
Shop This Post
Tell Us What You Think!
Growing your own onions is super rewarding. You can grow them organically, and enjoy all the benefits that they provide you with. They are considered to be a super food, and they can be stored for a long time if stored properly.
Have you grown onions before, or is this your first time growing onions? Was this post helpful to you?
Let us know if you have any comments or questions down in the comment section below.
Disclosure Policy
Disclosure: Some of the links in this post are “affiliate links”. This means if you click on a link and purchase the item, I will get an affiliate commission. It will not cost you any extra money, but it will help me pay for this website, and it will help me to keep providing you with helpful articles such as this one. I only post links to products that I personally use and love, or to products that I wish I could have, and that could be of value to you. The information that I provide you with, my blog, videos, and many resources are free.


Be the first to reply