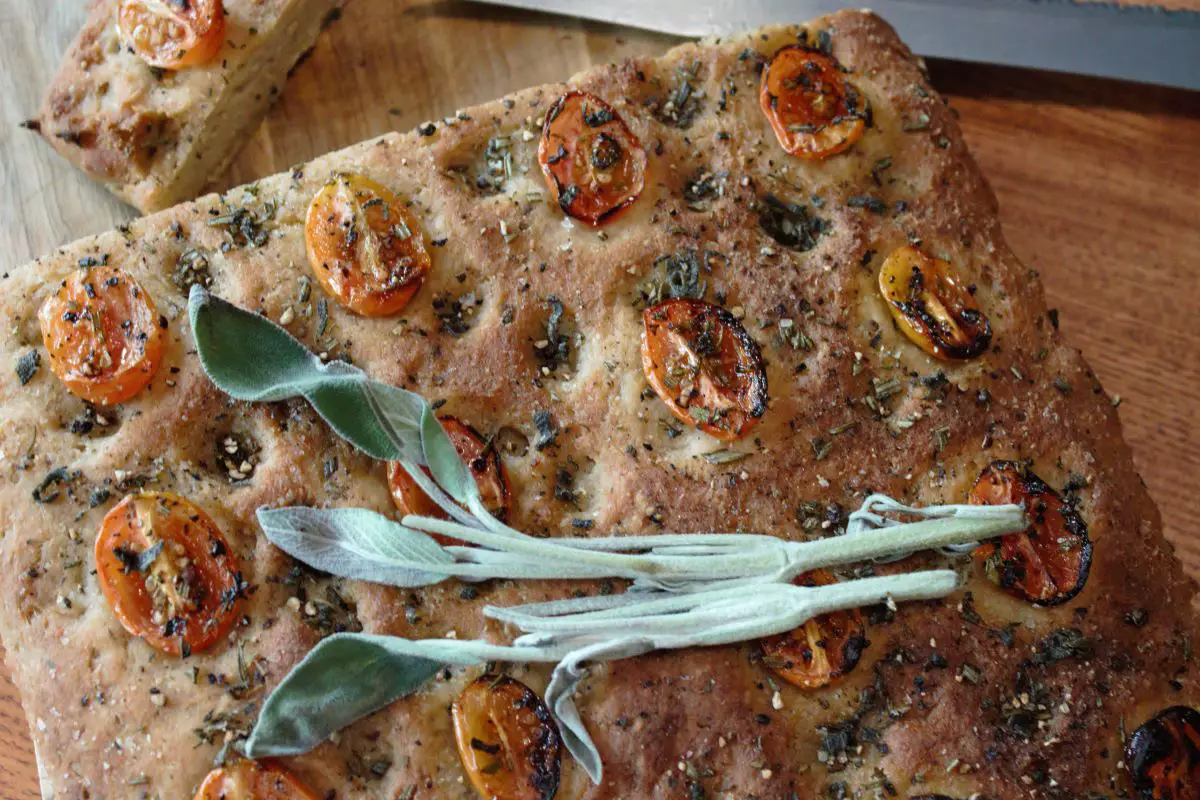
This Nut Free, Vegan, Gluten Free Focaccia Bread is seriously addicting and so simple to make. It is a yeast only bread. Focaccia bread is an Italian flat bread that is lightly topped with toppings similar to that of a pizza. This gluten free focaccia bread has a crunchy crust, and is soft on the inside. It is definitely a crowd pleaser.
Jump to RecipeBLOOMING THE YEAST
I personally never do this step. I always have my yeast stored in the fridge which allows it to last for a really long time, plus I bake a lot, but, if you are not sure that your yeast is active or not, then this is a crucial step.
Before I proceed on how to do this, I must say that I find the ideal place to store yeast is in the fridge, away from humidity, or in a cool dry place such as a cold storage room.
To bloom the yeast, you will need to mix in the water, sugar, and yeast together until the sugar is dissolved. The sugar is the food that the yeast will need to feed on in order to get activated.
Cover with a plate or plastic wrap, and then place in a warm place away from cold drafts.
After about 10 minutes, if your yeast is active, you should begin to see frothing at the top of the liquid, and what has the appearance of bubbles. If so, then your yeast is active and you can proceed with the next step.
WHAT IS PSYLLIUM HUSK?
The psyllium husk that we are using in this recipe comes in the form of a powder. Psyllium husk comes from the seeds of a plant known as Plantago Ovata, also known by Blond plantain and many other names.
psyllium has become popular for its many medicinal properties, such as improving gut health, heart health, and many other beneficial properties.
The reason we are adding psyllium in this gluten free focaccia bread recipe is to behave as the “gluten” or binding agent in the bread. Instead of using eggs to perform the binding action, I chose psyllium husk in order to keep this a vegan recipe.
Psyllium also adds a darker color to the bread making it look more esthetically pleasing. It also adds a great flavor, similar to that of the wheat, hence, making this bread extremely delicious.
My daughter thought that this nut free, vegan, gluten free bread was wheat bread, and she was devouring it. Her words, “mamma, can I have some more of that really addicting bread?” “You mean, the gluten free focaccia bread?” “Oh!, It’s gluten free! I didn’t know! I couldn’t even tell! I thought it was wheat bread!”
MIXING IN THE DRY INGREDIENTS
Mixing in the dry ingredients is an essential step of the bread making process. It will ensure that the bread texture is the same all over the bread.
Gluten free bread is made of many different types of flour. If you do not mix in the dry ingredients, you will end up with a weird textured bread.

The types of flour that we are using in here are brown rice flour, which is the bulk of the recipe, cornstarch, potato starch, and oat fiber. Do not be confused though, oat fiber is not the same as oat flour.
To get the perfect textured bread, make sure to mix the dry ingredients very well together until they are evenly distributed.
CAN I SUBSTITUE OAT FIBER WITH OAT FLOUR?
Oat flour is made from the outer shell that surrounds the oat grain. While oat flour is made from the entire grain of oat. The texture of oat fiber is different than that of the oat flour. So the answer is no, you cannot substitute oat fiber with oat flour.
Substituting oat fiber with oat flour will give a completely different texture to the bread, and I cannot guarantee that it would be good.
DO I NEED A KITCHEN SCALE?
I have tried this recipe using both grams, and measuring cups and spoons. There was a drastic difference between the amount measured by volume to that measured by wait.
I would highly recommend that you use a kitchen scale to make this recipe. If you do use one, you will always end up with the same result to having an amazing gluten free focaccia bread all the time. However, if you don’t I cannot guarantee that you would end up with this amazing result.
Kitchen scales are super cheep. If you click this link, it will take you to the exact one that I have in my kitchen. I have had it for many years, and it is still operating at maximum efficiency. I believe that kitchen scales are absolutely essential, and every kitchen should have them.
however, if I still haven’t convinced you yet that you absolutely need one, make sure to spoon in the dry ingredients into the measuring equipment rather than using them directly to scoop the flour. After that, you’ll want to ensure that you properly level the dry ingredients to the rim of the measuring tool.
PREPARING THE DOUGH
This part is so simple. All you need to do is spray a cookie sheet, or a deep-dish pan with some cooking spray or spread some oil onto it. You don’t want a lot of oil, but only a minute amount. The purpose of the oil is to simply grip the parchment paper that you will be laying onto the pan. If you do not use oil to stick the parchment paper to the pan, you will find it very difficult to work with.
Knead the dough by hand for about 30 seconds to 2 minutes until well combined. Spread the dough using the palm of your hand to a half inch thick rectangular form, and cover it with plastic wrap to prevent the dough from drying out and to allow it to rise properly.

Place the dough in a warm place away from cold drafts and allow it to rise for 2 to 3 hours, or until almost doubled in size.
Now for the fun part. Dip the tips of your fingers in some extra virgin olive oil, and using the tips of your fingers, punch a few surface holes in the dough to hold the oil and the seasonings. Do not punch the holes all the way through the dough. You just want to create “cup shapes”.
Sprinkle the seasoning, press in the tomatoes and whatever vegetables you want, drizzle with some olive oil, and bake on the middle rack of a 450 F oven for 30 – 35 minutes.

MORE AMAZING GLUTEN FREE BREAD RECIPES
Gluten Free Sourdough Bread Rolls

Nut Free – Vegan – Gluten Free Focaccia Bread Recipe
Ingredients
Equipment
Method
- In a small bowl, mix in the yeast, sugar, and water together, cover, and set aside in a warm place. You will know that the yeast is active when you see froth at the top of the water.
- Meanwhile, mix in the dry ingredients, and 1 teaspoon chopped rosemary, 1 teaspoon freshly grounded black pepper.
- Add in the wet ingredients to the dry ingredients, and mix until well combined and it begins to form a dough.
- Knead by hand for 30 seconds to 2 minutes until it is fully combined.
- Spread a thin layer of oil onto a baking sheet, and line it with parchment paper.
- Using the palm of your hand, spread the dough onto the parchment paper to form a ½-inch thick rectangular form.
- Cover with plastic wrap, and allow to rise in a warm place for 2 to 3 hours.
- Preheat oven to 450 F
- Meanwhile, remove plastic wrap, dip the tips of your fingers in some extra virgin olive oil, and create small indentations in the bread to hold the oil and the seasoning.
- Press in the tomatoes onto the top of the bread in whatever shape or form you wish. Sprinkle the remaining rosemary, and black pepper onto the bread. Season with some sea salt, and finally, drizzle the top with some extra virgin olive oil.
- You can also shred a little bit of Romano cheese onto the top of the bread, or any vegan cheese of your choosing, if you wish to keep this bread vegan.
- Place into the oven on the center rack, and bake for 30 to 35 minutes, or until fully browned, sounds sort of hollow when you tap onto it, and is crispy on the outside.
Disclosure: Some of the links in this post are “affiliate links”. This means if you click on a link and purchase the item, I will get an affiliate commission. It will not cost you any extra money, but it will help me pay for this website, and it will help me to keep providing you with helpful articles such as this one. I only post links to products that I personally use and love, or to products that I wish I could have, and that could be of value to you. The information that I provide you with, my blog, videos, and many resources are free.


Be the first to reply