
This pasta salad recipe is an easy and quick recipe, and super delicious. You’ll want to make it over and over again. It is a twist off of a Russian potato salad known as “salad russe”. I can practically eat this whole thing of pasta salad by myself (for several meals) and not complain.
I was introduced to this salad as a teenager by one of my mom’s friends. She came over to stay with us for a couple of days, and this was one of the recipes that she taught me as we were preparing lunch.
I LOVE, LOVE this salad. It is so addicting! No matter how many carbs, and fat it has in it, it still has vegetables. So that makes it good right? It is so refreshing, and it is a winner at any potluck, party, or just as a weekend lunch.
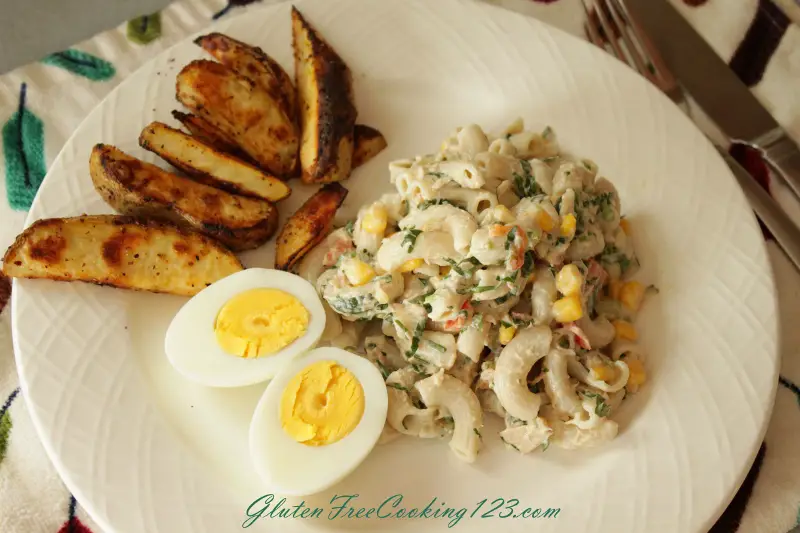
It is especially refreshing in the summer. At my parents’ house, we usually served this salad with boiled eggs and fries as a side dish. Or, it was our side dish whenever we made sheesh kebab or any type of barbeque which usually happened on the weekend. It definitely pares well with any type of barbeque.
Watch the Video
Origin of Salad Russe
The traditional salad russe from my understanding is a potato salad not pasta salad. However, it includes many of the same ingredients that are in this pasta salad.
Salad russe can include peas, carrots, chopped parsley, ham, eggs, mayo. Some people choose to add corn, cabbage, and other vegetables.
In this recipe our source of protein is tuna. You can also choose to boil some eggs, chop them up and add them to the salad. Just make sure to cool the eggs before adding them into the salad.
I have also seen some versions of salad russe that use beets as a base instead of potatoes or pasta.
You can easily make this pasta salad gluten free by using gluten free mini pasta shells.
Ingredients For Making Pasta Salad
- 16 ounces gluten free brown rice shell pasta or elbow pasta (cooked according to package instructions)
- ¾ cup mayonnaise
- 2 (5 ounces) white tuna cans in water, drained
- 1 (15 ounces) can of corn, drained
- 1 to 2 medium tomatoes thinly sliced
- 1/3 of a large English cucumber, diced into small pieces
- 3 to 4 tablespoons fresh lemon juice
- 1 small bunch parsley, chopped
- 2 ½ teaspoons salt or to taste
- Salt to add to the pasta water before cooking the pasta
Utensils
- Large mixing bowl
- Mixing spoon
- Chopping board
- Sharp knife
- Measuring cups
- Measuring Spoons
- Lemon Juicer
- Colander
- Large Pot
How to Make Pasta Salad
How to Cook Gluten Free Pasta
For the first step, you need to cook your pasta according to the package direction. I personally like to cook mine 1 to 2 minutes less than the recommended time because I find that the pasta tends to stay uniform in this manner.
When you are cooking gluten free pasta, you will need to stir the pasta very frequently, about every 1 to 2 minutes.
When the cooking time approaches the time recommended on the package, test the pasta to see if it is tender enough to your liking.
Gluten free pasta tends to reach the mush state very quickly, so you’ll want to take the pasta off the heat as soon as it reaches the desired tenderness. You’ll also want to keep your eyes on it like a hawk.
Once the pasta reaches the desired tenderness, immediately take it off the heat, drain it into a colander, and rinse it under cold water until it is fully cooled. This will keep the pasta shells uniform and in separate pieces instead of being in a large clump.
If you were cooking pasta for a warm pasta dish, and you do not want to rinse it under cold water, drizzle it with some olive oil and toss it around a bit immediately after you drain it. Then cover the pasta to keep it moist and warm. The olive oil will prevent the gluten free pasta from sticking to itself.
What Type of Gluten Free Pasta Is the Best
This of course is very subjective. We all have unique taste buds, and we all like different things.
I am very picky when it comes to gluten free pasta. The only type I like to use is the brown rice pasta. I find that most other pasta such as quinoa and corn to be very grainy and gritty.
I personally do not like the taste of quinoa in my pasta. Call me crazy, but the taste of quinoa in pasta just does not seem right to me.
I like to cook my pasta to all dente. You will want to add a lot of salt to your pasta as it is cooking. This is where it gets most of its flavor.
Brown rice pasta has a great texture and is very similar in both taste and texture to wheat pasta. So if you were serving this pasta salad at a party or a holiday gathering, you can be sure that your friends and family will love it, and wouldn’t be able to tell the difference.
Prepping the Ingredients for Salad Russe
Now its time to chop your veggies.
Prepping the Parsley

Before you begin chopping your parsley, you’ll want to take out all the yellow pieces, and sometimes weird weeds that end up in your parsley. I don’t want weeds in my parsley!
You’ll also need to line the stems up to make it into a tree form or a ponytail. You need all the leaves to be on one side, and all the stems on the opposite side.
After this, proceed to rinse your parsley in a pot filled with water. Dunk it in several times. Discard the water, and repeat until you see no more dirt or junk in your water. This step is crucial because you never know what can be hiding in your parsley!
In the summer and spring the parsley bunches seem to be dirtier than usual. When this happens, I like to soak my parsley bunches in salt water for 10 minutes. This helps kill any bugs that might be hiding in there.
Before chopping the parsley, you’ll need to let it drain completely for about 10 to 15 minutes.

To chop the parsley, Hold it by the leaves, cut the stems as close to the leaves as possible, and discard the stems or put them in your compost pile as I like to do.
Now that you have done all that work on your parsley, you are ready for the next step.
Adding in the Remaining Ingredients
Open your tuna cans and drain them. Dump them into your mixing bowl, and separate the big chunks using a fork. Unless you like big chunks of tuna in your salad, then of course you can leave them as is!
Chop the rest of your veggies and add them into the bowl with the parsley and tuna.
Add in the corn, lemon juice, salt, mayonnaise, and pasta.
Adjusting the Seasoning and Ingredients
Mix everything until it is well combined, and adjust the seasoning to your liking.
You can even add more mayonnaise if you think that you would like more.
This recipe is so versatile. I have seen people adding boiled eggs, and cabbage into their recipes. It varies from home to home. So don’t be afraid to make it your own.
This is what cooking is all about. We all have different taste buds, and different types of food that we like, so mix it up and make it your own!
The Importance of Chilling Pasta Salad
This, I believe is a very crucial step. You might find that you want to skip it, but this will drastically improve the flavor of the dish.
You’ll need to chill it in the fridge for 1 to 2 hours or overnight before serving.
This will help enhance the flavors and it will bind the mayonnaise to the pasta shells and the vegetables making an excellent salad in return.
You can add a bit of mayonnaise and adjust the seasonings right before you serve it if you find that it needs to be adjusted after the chilling process.
Gluten free pasta can dry up a little in the fridge, so adding a bit of mayonnaise will help in refreshing it and giving it the help it needs.
Serve as a side for a barbecue, or as I suggested before with some fries and boiled eggs. I don’t know why, but these work so well together. Enjoy, repeat, and don’t forget to share!
More Great Recipes And Gardening Related Topics
How To Grow Herbs From Seeds Indoors For Beginners
Shish Tawook Mediterranean Chicken Shish Kabob Recipe
Gluten Free Peanut Chicken Recipe
Shop this Post
gluten free brown rice shell pasta


Pasta Salad (Salad Russe)
Ingredients
Equipment
Method
- Fill a large pot with water and bring to a boil on high heat. Add salt to taste, and cook pasta according to package direction to al dente texture. (Don’t forget to stir your pasta every now and then while it is cooking to prevent it from sticking.)
- After the pasta has cooked, drain it using a colander. Rinse it with cold water until it is completely cooled, rinse the pot with cold water to cool it down, put the pasta back into the pot, fill the pot with cold water to cover the pasta with water, and let it sit there for about 15 minutes. This will help cool the pasta completely and prevent it from sticking.
- Chop all your vegetables. Drain the tuna cans, place them in the mixing bowl, and shred them with a fork into small bites. Add in all the vegetables to the mixing bowl, including the drained canned corn. Drain the pasta well, and add it into the mixing bowl with the chopped vegetables and the tuna. Add in the mayonnaise, lemon juice, and salt. Mix until everything is well combined. Taste and adjust seasoning to your liking.
- Chill in the fridge for 1 to 2 hours or overnight before serving. This will help enhance the flavors and it will bind the mayonnaise to the pasta shells and the vegetables making an excellent salad in return.
- Serve as a side for a barbecue, or as I suggested before with some fries and boiled eggs. I don’t know why, but these work so well together. Enjoy, repeat, and don’t forget to share!
Video
Disclosure Pollicy
Disclosure: Some of the links in this post are “affiliate links”. This means if you click on a link and purchase the item, I will get an affiliate commission. It will not cost you any extra money, but it will help me pay for this website, and it will help me to keep providing you with helpful articles such as this one. I only post links to products that I personally use and love, or to products that I wish I could have, and that could be of value to you. The information that I provide you with, my blog, videos, and many resources are free.
Be the first to reply