
Creating a beautiful outdoor space requires a lot of thinking, hard work, money, time, and patience. So before you jump into creating your permanent outdoor space, here are 7 reasons why you should first make a temporary patio on a budget, and a quick overview of how to make a temporary patio.
- To be able to make quick changes without any severe consequences
- To help you decide the proper location for your patio
- To help you determine the proper shape and size for your patio
- To help you determine the proper material and furniture for your patio
- To avoid lost cost and effort
- To avoid dissatisfaction over the outdoor space which you have created
- to create the perfect space for you, your family and friends, and the way how you will be using the space
TO BE ABLE TO MAKE QUICK CHANGES WITHOUT ANY SEVERE CONSEQUENCES
This is a big reason why you should first make a temporary patio. Solid patios are usually built of heavy materials such as bricks, cement, gravel, slate stones, wood pallets, and such. Generally speaking, most of these materials are pretty costly as well.
Moving or changing the shape or direction of a solid patio does not become an option once it is fully assembled because of the weight, cost and requirements that are associated with this task.
This is where making a temporary patio comes in handy. A temporary patio allows you to make quick changes anywhere and any how you like to your outdoor space.
Usually, the consequences associated into making changes to a temporary patio are very minimal if any. Maybe some dead grass patches here and there, or perhaps a plant that has moved to a new home, but that’s pretty much it.
If you do not like it’s shape, it’s size, it’s location, you can easily change that without breaking your back or your wallet.
TO HELP YOU DECIDE THE PROPER LOCATION FOR YOUR PATIO
As you sit and experience the outdoors on your new patio, you might decide that this is not the proper location for it. It might not give you the privacy that you were looking for, or the feel that you were going after.
Let’s be clear, you cannot move a solid, finished patio from one location to another. I guess it might be possible, but the cost and work associated with it are pretty severe.
On the other hand, moving a temporary patio is a piece of cake, and there is literally no cost associated with it.
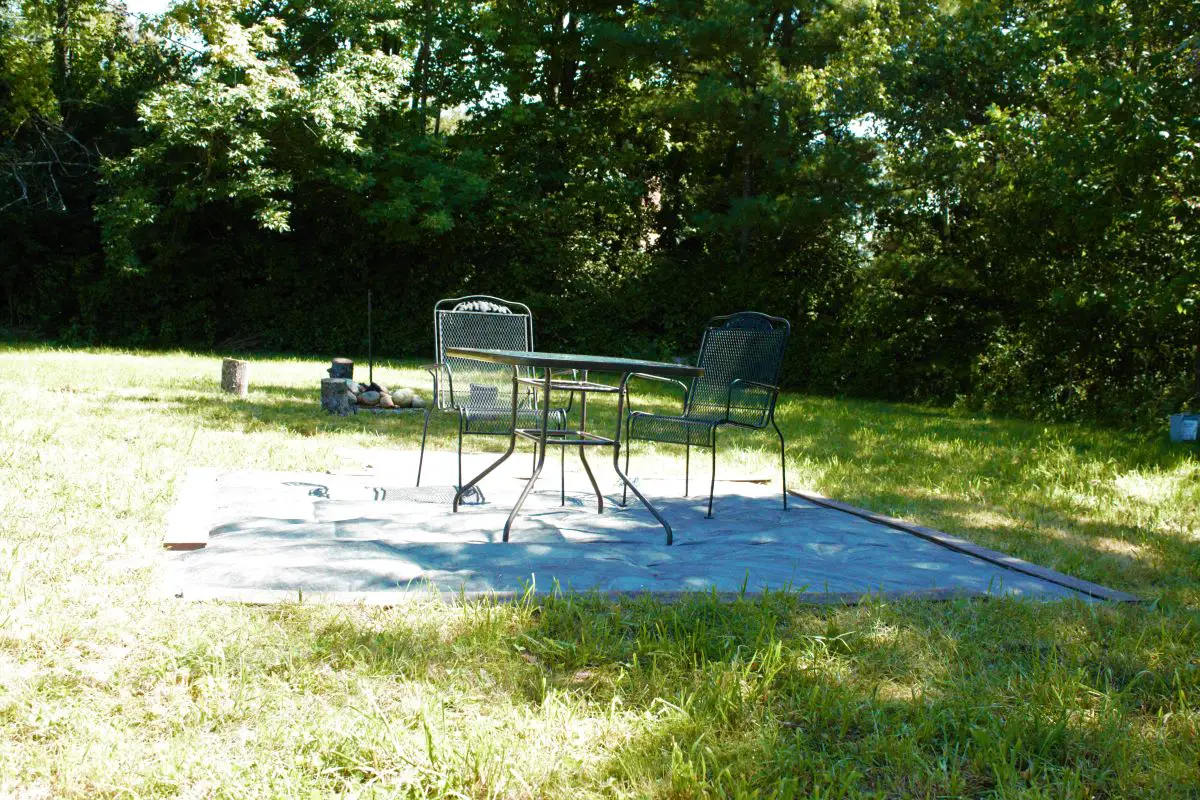
If you have used landscaping fabric like I have to build your temporary patio, you could easily, and carefully, remove the landscaping fabric from one location to another. You can reuse the landscaping staples as well, and the temporary furniture that you have over it. It is not labor intensive. It is super simple. I set up this entire space with the help of my 9 and 11 years old kids, with a baby on our side.
TO HELP YOU DETERMINE THE PROPER SIZE FOR YOUR PATIO
After trying our new outdoor space we were able to see that we needed more space for our patio in order to be able to host friends and family over.
Because we have set up a temporary outdoor patio, it gave us the ability to easily expand our “patio” and make quick changes to it such as slightly shift it a couple feet from one side to the other. You simply cannot do that with a permanent patio.
A temporary patio also gives you the ability to change its shape and layout. You may want it more curvy, or more square on one side or the other.
TO HELP YOU DETERMINE THE PROPER MATERIAL AND FURNITURE FOR YOUR PATIO
As you use your patio, you are going to discover the many things that you are using it for. Are you using it specifically for lounging? for having friends over for a coffee or drink? for having cookouts? for a place to have your dinner? A place to enjoy smores? A place to cook your dinner?
As you use your patio, you might want to keep a journal and take notes on how you are using it. This will help you decide the kind of flooring and furniture that you would like to have for your permanent patio. Perhaps the flooring and furniture that you have thought you would want might not be appropriate for the way you are going to use it, or they might be.
You might have thought that you might not need a swing for your patio, and now you think that a swing is the appropriate furniture for that place.
Also you might want to take note of light and shade in the space, and the time of day that you use it most. This will help you decide whether you need to provide a shading structure or not.
Another thing to consider is wind. How does wind usually travel in that space. knowing the usual direction of wind will allow you to determine where you will place your firepit if you decide to have one. It will also allow you to determine if you need to plant wind blocking plants around the space or not.
TO AVOID LOST COST AND EFFORT
A temporary patio can be done on a very low budget if you choose your material wisely.
The cost and the type of material for a temporary patio depends on whether you want your patio to last you for a few years or a few seasons.
You might want to ask yourself the question, “what is the purpose of my temporary patio? And how am I going to use it?” to help you decide the material that you should be using.
Once you set up a permanent patio, moving it or changing its shape or its location can be very labor intensive, and very costly. Not to mention that setting up and tearing down a permanent patio is a time consuming process and waisted time and effort.
A temporary patio will help you avoid lost cost, heart break over what you wished you could have had, lost effort, lost time, and just general dissatisfaction.
TO AVOID DISSATISFACTION OVER THE OUTDOOR SPACE WHICH YOU HAVE CREATED
Once you have a solid permanent structure, you are sort of stuck with it whether you like it or not. Unless you are willing to put the extra money and effort into moving it, changing it, and fixing it to how you would like it to be instead of what it ended up being.
A temporary patio helps you avoid all that money, time, and effort waisted. Overall, it helps you avoid any dissatisfaction that you might get from installing an immediate permanent patio.
A temporary patio gives you the experience of what your permanent patio might look and feel like, or how you would want it to look and feel like. It helps you make changes without any sever consequences, and with minimal cost added if any.
You are not stuck with a temporary patio. The idea behind it, is to help you determine all the things that you would like to have about a permanent patio without the added cost, time, and effort.
It helps you avoid the mistakes that could happen in the process of creating a permanent patio so that when you are ready to create your permanent patio, everything is lined up and ready for how you would like it to feel and look like.
Now you know exactly how wide you would like it to be, the exact location that it needs to be at, the curvature that you would like it to take, the furniture that you would need, the type of flooring that is required and all the details that go along with creating a permanent patio.
And finally,
TO CREATE THE PERFECT SPACE FOR YOU, YOUR FAMILY AND FRIENDS, AND THE WAY HOW YOU WILL BE USING THE SPACE
After all, you are creating this outdoor patio so that you can enjoy it with your family and friends. So before you build a permanent structure, you want to be sure that it is going to end up being the way how you imagined it to be. This is where the temporary patio comes in handy.
Based on the advice that I have provided you with, it would be effort well spent in creating a temporary patio to ensure your 100 % satisfaction with your permanent patio.
A temporary patio is after all temporary. It is not there to take the place of your permanent patio, but it is there to help you make the right choices and decisions for your permanent outdoor seating area.
The cost of building a temporary patio can be very minimal if you choose your material wisely. Here is how I built our temporary patio to help us decide where and how we would like our permanent patio to look like.
QUICK OVERVIEW OF HOW TO MAKE A TEMPORARY PATIO
Material you’ll need
- Landscaping fabric
- Galvanized Landscaping staples
- Pressure treated wood (optional)
- Cheap outdoor furniture, (ideas included)
- A few Large stones
Laying out the area

If the area you choose to make your temporary patio is not leveled, you can level it by either removing some of the grass or by adding dirt or sand over the grass to level it. It does not have to be super leveled; However, it has to be leveled enough where you can place a table and chairs without them tipping over.
Lay out the landscape fabric in the area that you believe you would like your patio to be. Then, cut The fabric in the shape that you want your patio to look like.
You will need the landscaping fabric pieces to overlap each other a bit. This will stop the grass from growing in between the fabric.
Staple the landscaping fabric into the ground using galvanized landscaping staples. I like to use the 6 inch galvanized landscaping staples. Why? Because they are less likely to get ripped out of the ground due to strong wind. They can also last in the ground for many seasons without rusting.
you’ll want to staple the fabric every couple feet on the outer edges to prevent it from coming off. Stapling the middle of the fabric is also important to prevent the wind from blowing it off. I like to staple it about every yard or so.
Finishing the edges
You can now, if you choose to, place some pressure treated wood on the outer edges of the landscaping fabric. This will prevent the lawn mower from tearing the fabric as you mow the grass around the area.
This step will prevent the grass from growing in that area. It will also give you a visual perspective of how your patio would look like.
What If you were planning on placing a firepit in that area? What should you do? In that case, avoid placing any landscaping fabric under the firepit or around it as it creates a fire hazard.
The finishing touches
You can now place your cheap outdoor furniture over your temporary patio area. Use it, enjoy it, and make changes to it as necessary.
For furniture, you can simply use some cheap plastic chairs and a table. Or, you can use a cut up log for a seating option. You can also create a table using wood pallets, or you can buy used outdoor furniture.

Creating a fire pit
This is a very simple step. All you need to do is simply gather a few large stones from around your property. Lay them out up against each other in a circular shape, and your firepit is ready to go.
If you live in New England, then you’re in luck! You can find any old large stone by simply putting a shovel into the ground. However, if you are not a lucky New Englander, you might have to buy a firepit.


Be the first to reply