
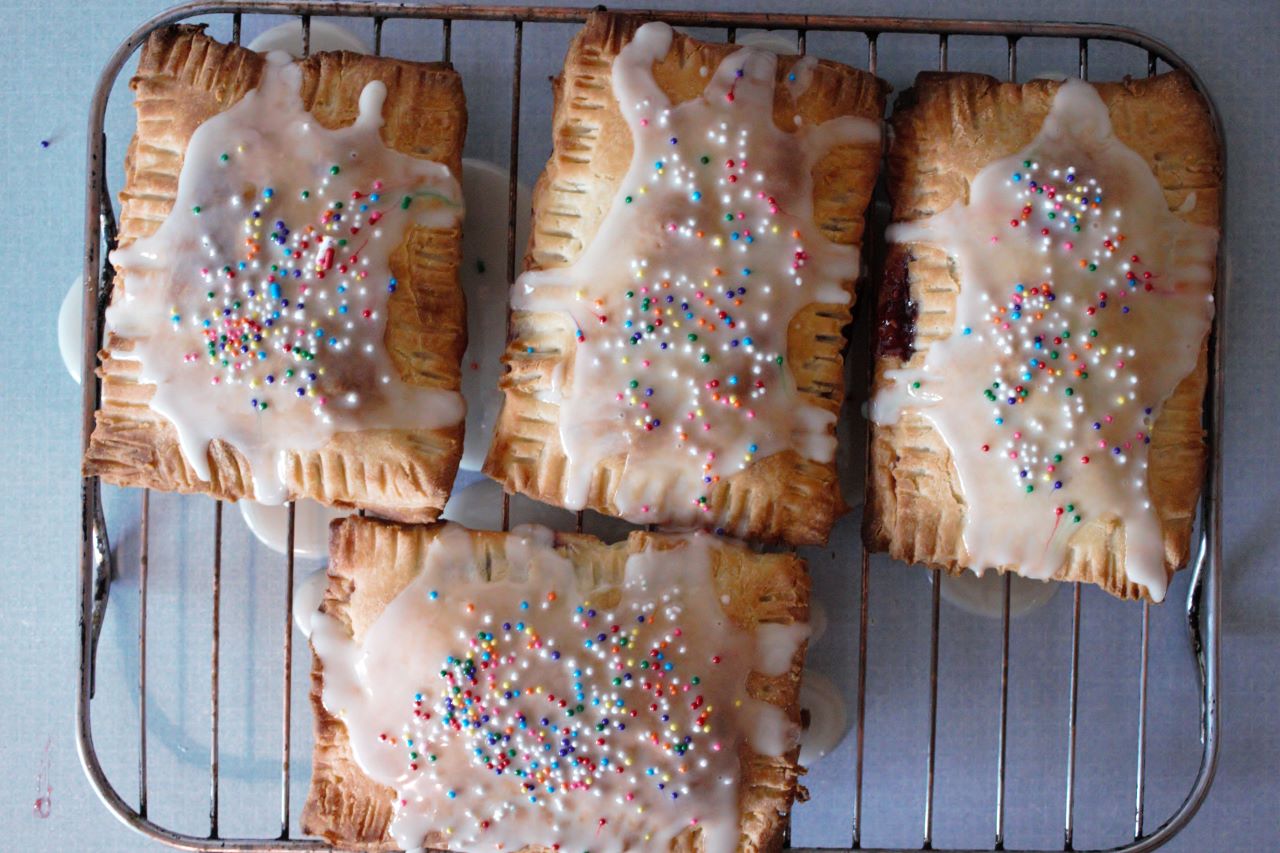
These Homemade Gluten Free Pop Tarts are super easy to make. They are delicious, flaky, buttery gluten free pastry that is filled with strawberry preserve, or any preserve of your liking, and topped with some icing. Enjoy it warm or room temperature. This makes the perfect breakfast for the upcoming holidays, or any day for that matter!
Here’s what you’ll need to make these delicious gluten free pop tarts.
Ingredients:
- For the pop tarts
- You will need a Gluten Free Super Flaky Pie Crust. If you do not have this ready, click on the blue link to take you to the recipe.
- Strawberry Preserve. You could use homemade, but I am using store bought here because com’on, we are already making these homemade gluten free pop tarts, we don’t need the extra work!
- Chantal’s Gluten Free All Purpose Flour Blend for dusting
- For the egg wash
- egg
- water, to make the egg wash easily spreadable, and it will prevent it from tasting eggy once it’s baked.
- For the icing
- powdered sugar
- milk of your choice or heavy cream
- vanilla extract
- almond extract, which is going to give this recipe another level of amazing flavor
- Funfetti sprinkles, because we want it to look pretty, and not for any other reason.
Utensils
You might want to have these things ready before you start to make the process go a little quicker.
- Baking sheet
- Parchment paper or silicone pad
- Whisk
- Rubber spatula, to scrape the icing or whatever it is that needs scraping.
- Spatula
- Cooling rack
- Measuring spoons
- Measuring cups
- Rolling pin
- Small spoon
- Small bowl
- Fork
- Pastry brush
- sifter
Ok, before I start, I have to say that I was never a pop tart fan, but I thought that I’ll give them a try since my son never had the chance to try pop tarts yet.
It is not something that I normally buy for his sister (she is not on a gluten free diet).
But for those few occasions when I do get her some store bought pop tarts, my son gets those gazing eyes, wondering what pop tarts might taste like.
So, I decided to make the most delicious gluten free pop tarts for him.
However, that put me in a dilemma because once I made them, everyone wanted to eat them! They were SUPER DELICIOUS!
So now when I do make pop tarts, I have to make tons!
Directions
If you haven’t tried my Gluten Free Super Flaky Pie Crust yet, go ahead and click on the link to take you there because, honestly, this is the best gluten free pie crust to make these pop tarts with.
This gluten free pie crust will give you the flakiest, butteriest (not a word), most delicious gluten free pop tarts. It is the main ingredient for this recipe.

Chilling the pie crust
If you have that Gluten Free Super Flaky Pie Crust already made, make sure to chill it for at least 30 minutes before you begin making these gluten free pop tarts.
This step is super important because you do not want the butter that is present in the pastry to melt.
If the butter melts, you will end up with a crumbly, and non flaky pop tarts.
So, as you work with the pastry dough, if you feel that it is getting warm and the butter is beginning to melt, wrap it in some plastic wrap, and set it back in the fridge for 10 to 20 minutes before you begin working with it again.
To prevent the butter from melting, you can wash your hands with cold water to cool them down. This way, it is less likely for the butter to melt as it touches your hands.

Rolling the gluten free pie crust, you can also call it pastry dough
Lightly sprinkle a counter top with some of Chantal’s Gluten Free All Purpose Flour Blend.
Don’t sprinkle too much flour. You do not want to dry out the pastry dough.
Sprinkle the rolling pin with some flour, and rub it onto the rolling pin. This will prevent the rolling pin from sticking to the pie crust as you apply pressure to it.
Sprinkle a little bit of flour onto the gluten free pie crust, and rub it onto its surface. Remove any excess flour. We are not trying to incorporate flour into the pastry dough, we are simply trying to prevent it from sticking to the rolling pin.
Roll the gluten free pie crust into a rectangle, or square that is quarter inch in thickness. If you roll it too thin, you will end up with less crust, and less flakes.

Cutting out the pop tart shapes
Cut rectangular shapes of about four-inch in length and three-inch in width into the rolled out pie crust.
Make sure you have an even number of rectangles. Because in the end, you are going to place two rectangles on top of each other to create each pop tart.
Preparing the egg wash
For the egg wash, you will need to mix in 1 egg with 2 tablespoons water.
The water helps the egg wash to be easily spreadable. It also prevents it from having that eggy taste after it is baked.
The egg wash will also give this gluten free pastry dough that beautiful golden color once it’s baked.
You can also skip the egg wash altogether, which I ended up doing here because I had no eggs when I was making this recipe.
Just remember though, that the color will be more beautiful and uniform if you do use an egg wash.
So if you are trying to present them for a Christmas brunch with some friends and family, you might want to use the egg wash.
If you are not using an egg wash, Just simply brush the edges of the pop tart rectangles with some cold water to help the two rectangles to stick together.

Filling the pop tarts
To fill the pop tarts, take half the amount of the rectangles that you have cut out, and fill the center of each triangle with a little bit of the strawberry preserve.
You do not want to fill it too much because the preserve will end up leaking out the sides of the pop tarts while it is being baked.
Make sure to leave around half an inch rim on the outside of each rectangle. This will serve to seal both rectangles to each other.
Try not to have any jam on the rim as it will prevent the pop tarts from sealing properly.
You can see that I didn’t follow my own rules in this picture.
Well, I did fill it too much… Sooooo… it did end up leaking a bit when I sealed it… shhhh… No one noticed…

Sealing the pop tarts
Take some of the egg wash which you have prepared and lightly brush the rim of each filled rectangle with it.
Do not use too much egg wash because it will damage the texture of the pop tart, and it will also prevent it from sealing properly.
Take a pastry dough rectangle that is not filled with preserve or jam whichever you choose. Place that rectangle on top of another that is filled with preserve.
Press the edges of both rectangles to each other. Press them by hand first, and then you can use a fork to create a decorative rim.
Do not press too hard with the fork because it will cause the pastry dough to tear. Remember, there is no gluten to hold the dough together. Being gentle is key!

Transferring the pop tarts onto a baking sheet
Line a baking sheet with some parchment paper or a silicone pad to prevent the pop tarts from sticking.
You can use a spatula to transfer the pop tarts onto the baking sheet.
You can also create holes on the surface of the pop tarts, by poking the top of the pop tarts a couple times using a fork. This will help release some of the air in the pop tarts while they are being baked, but I find it unnecessary.
Baking the pop tarts
At this stage, you can preheat your oven to 425 F. While the oven is preheating, chill the pop tarts in the fridge.
If you notice that the pop tarts are too warm and the butter in the pastry is melting, chill them for 10 to 20 minutes before baking, or preheating your oven.
Once the pop tarts are ready to be baked, lightly brush the top of the pop tarts with the egg wash.
Place the pop tarts on the center rack of the preheated oven, and allow them to bake for 15 minutes or until golden brown.

Cooling the pop tarts
Once the pop tarts are fully baked, remove from the oven and set aside to cool for about 5 minutes.
Once the five minutes are over, using a spatula, carefully transfer off the pan onto a cooling rack.
Allow them to cool either completely or almost completely.

Preparing the glaze
While the pop tarts are cooling, you can work on preparing the icing.
The first step you’ll need to do here is sift the sugar. I know it is powdered sugar, it is already fine you might think, but no!
Powdered sugar can and does have lumps in it. So if you do not want your glaze to be lumpy, it is important that you sift the sugar.
You will need to mix in the sugar, milk, vanilla extract, and almond extract using a whisk. Whisk everything really well until it becomes super smooth.
observe the consistency of the glaze after it has been fully mixed. If the consistency is pourable, then you are good to go.
If the consistency is not pourable, add half a teaspoon of liquid at a time to the glaze. mix with every addition, and check the consistency before you add any more.

Glazing the pop tarts
Once the pop tarts have cooled, it is now time to cover them with the glaze.
If the pop tarts are too warm, do not pour the glaze on them as the glaze will melt and pour off the sides. Like in the picture above.
Ok, I was trying to hurry hear because my baby woke up and needed to eat… I won’t judge you if you won’t judge me.
If they are slightly warm, it is ok to pour the glaze. However, it is preferable that you wait until they are completely cooled before you pour the glaze on top.
Pour some glaze on top and allow it to settle. You can leave a rim of about a quarter inch around the pop tart without any glaze. This will make them look more like the store bought pop tart. If that’s what you want.
Sprinkle with funfetti, and serve!
You might be able to heat them slightly in the toaster oven.
You can store these pop tarts stored at room temperature for 2 to 3 days, but who are we kidding? These pop tarts won’t even last for a few seconds!

Freezing the pop tarts
To store these pop tarts in the freezer, place the prepared, nonbaked pop tarts in the lined pan, and flash freeze them until they are hard.
Once they are fully frozen, place them in a freezer bag with parchment paper in between each pop tart, and set them in the freezer until ready to be baked.
I can’t give you the instruction for baking the frozen pop tarts because I haven’t tried it yet. I will update this recipe once I do.
If you do try baking these pop tarts from frozen, share with us how you did it in the comment section below!

Homemade Gluten Free Pop Tarts
Ingredients
Equipment
Method
- Preheat the oven to 425 F
- Before you begin, make sure that the gluten free super flaky pie crust has been chilled for 30 minutes or more.
- In a small bowl, using a fork, beat 1 egg with 2 tablespoons water to make the egg wash.
- Dust the counter top, and the rolling pin with some of Chantal’s Gluten Free All Purpose Flour Blend
- Roll the gluten free pie crust onto the floured surface into a square or rectangle ¼ inch in thickness.
- Cut the pie crust into 3-inch-wide and 4-inch-long rectangles.
- Take half the amount of available rectangles, and cover the middle of each rectangle with 1 to 2 tablespoons of strawberry preserve, leaving a half inch rim around the rectangle.
- Using a pastry brush, brush the rim of the rectangles that are filled with the preserve with some egg wash.
- Cover the strawberry filled triangles with another triangle piece pie crust.
- Press the edges of the top rectangle to the edges of the bottom rectangle.
- Repeat this process for the remaining rectangles.
- Line a cookie sheet with some parchment paper or a silicone pad
- If you notice that at this point the pie crust has become warm, and you feel that the butter in the pie crust began to melt. Place the pop tarts on the lined cookie sheet, poke some holes on their tops using a fork, and place the pan filled with pop tarts into the fridge for 10 to 30 minutes.
- After the pop tarts have chilled, lightly brush them with some egg wash, place them into the preheated oven on the middle rack, and allow them to bake for 15 minutes, or until golden brown.
- After the pop tarts have fully baked, remove them from the oven, and allow them to cool on the pan for 3 to 5 minutes.
- Using a spatula, carefully lift the pop tart off the pan and set them onto a cooling rack.
- While the pop tarts are cooling, you can begin to work on the glaze.
- Sift the powdered sugar into a bowl. Add in 2 tablespoons milk or heavy cream, vanilla extract, and almond extract. Whisk until you achieve a very smooth texture.
- If the consistency of the glaze is too stiff and not pourable, you can add half a teaspoon of milk at a time until you achieve a pourable consistency. Do not add too much liquid as it can prevent the icing from hardening once it is poured onto the pop tarts.
- Once the pop tarts have cooled, drizzle with the prepared icing, and sprinkle with some funfetti.
- Serve and enjoy a delicious, freshly made, fluffy, flaky, buttery, warm, gluten free pop tart.
Notes
Disclosure: Some of the links in this post are “affiliate links”. This means if you click on a link and purchase the item, I will get an affiliate commission. It will not cost you any extra money, but it will help me pay for this website, and it will help me to keep providing you with helpful articles such as this one. I only post links to products that I personally use and love, or to products that I wish I could have, and that could be of value to you. The information that I provide you with, my blog, videos, and many resources are free.
Be the first to reply