
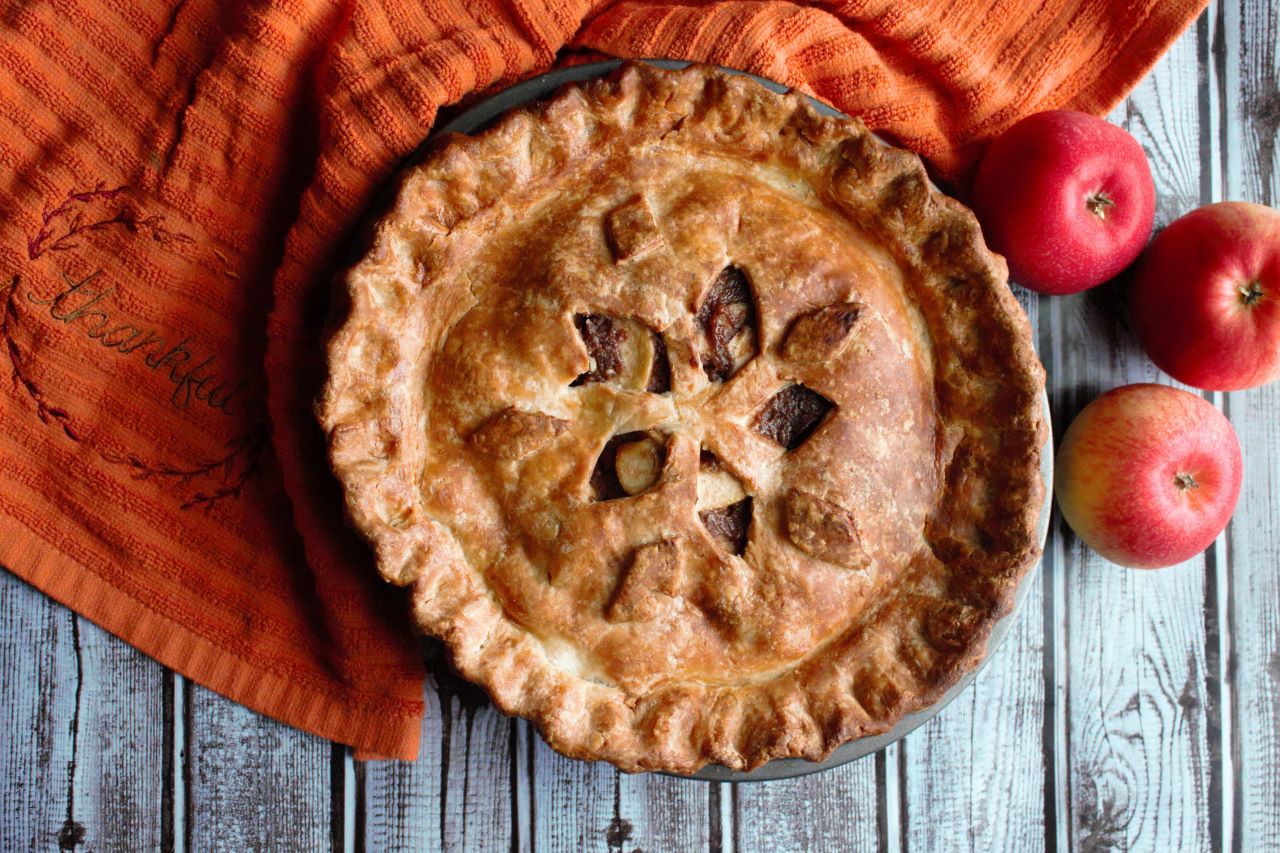
Gluten Free apple pie is so decadent with flavors such as cinnamon, nutmeg, cloves, and allspice. It is adorned with brown sugar and butter, and covered with a super flaky buttery gluten free pie crust. When you make this apple pie, the heavenly smells will make you feel as if you just walked into the fanciest bakery in town. It makes the perfect treat for thanksgiving or any holiday.
Jump to RecipeINGREDIENTS FOR YOUR GLUTEN FREE APPLE PIE
- Gluten Free Super Flaky Pie Crust
- Granny smith apples the provide that tangy flavor.
- Gala apples for sweetness
- Brown sugar
- Butter to give you that smooth and decadent experience.
- Cinnamon
- Nutmeg
- Allspice
- Ground cloves
- Vanilla it gives our apple pie filling an extra rich flavor
- Salt to balance out the flavors
- Water or apple cider
- Corn starch
- Lemon juice
- Egg wash
- Chantal’s Gluten Free All Purpose Flour Blend, for sprinkling
UTENSILS NEEDED TO MAKE THIS APPLE PIE
- Chopping board
- Sharp knife
- Deep wide skillet
- Measuring cups
- Measuring spoons
- Spatula
- Wooden spoon
- Sieve
- Large bowl
- Peeler
- Apple Corer or a small spoon
- 9 inch pie pan
- Scraping tool
- Plastic wrap
- Pastry brush
- Small bowl
- Cookie sheet
- Aluminum foil
- Kitchen Scissors
HAVING YOUR GLUTEN FREE PIE CRUST READY
Seriously, this apple pie is one of the most decadent apple pies that you can have in your life. Regardless of the amount of butter that is in here, a good piece of pie is a good piece of pie, and it is ok to indulge one’s self with something this delicious every now and then.

Before you start making this apple pie, make sure to have my Gluten Free Super Flaky Pie Crust Ready You’ll want to make sure that the pie crust is chilled and ready to use. You can follow the aqua-colored link above to see how to make this amazing pie crust.
CHOOSING THE APPLES FOR THIS GLUTEN FREE APPLE PIE
I find that the type of apples that you choose will definitely impact the end result of the pie. They can make or break the pie.
I personally prefer to use a mixture of apples. My favorite apples to use are the Granny Smith apples because they provide that bit of tanginess. I also like to use some sweet apples to offset that tanginess and balance out the flavors.
My sweet source of apples would be Gala, red delicious, or honey crisp apples not in any particular order of importance.

Some people prefer to use granny smith alone because they do not want the added sweetness of the apples, and some prefer to use the sweet types of apples alone such as the types that I have mentioned above.
No matter what types of apples you choose, when choosing the apples for your apple pie, make sure that they are still firm and crispy. Having firm and crispy apples will give you the best pie.
If your apples are soft, the texture of the apple pie would be more like apple sauce rather than those delicious, perfectly cooked apple slices.
HOW TO KEEP THE APPLES IN YOUR GLUTEN FREE APPLE PIE FROM BROWNING?
You’ll need to prepare a water bath for the apples to prevent them from browning as you slice them to prepare them for the filling.
To do that, combine two quarts of cold water with a quarter cup of lemon juice. The acid in the lemon juice is what will prevent the apples from browning. Mixing it in with the water will disperse it enough to touch all the parts of the apples.

As you Slice the apples and place them in the water, mix in the apples with the water to prevent the top layer from browning.
If you notice that the apples are browning even after adding the lemon juice, you can add a little more lemon juice to prevent that from happening. Just make sure to mix it in well after you add it.
PREPARING THE APPLES FOR THIS APPLE PIE RECIPE

Using a peeler, peel the apples. Slice them in half, and using a small spoon or an apple corer, scoop in the core of the apples as if you were scooping Ice-cream.
It might be a bit tricky if you were using a spoon, but you can carve in a circle around the core using a small spoon, and then scoop it out.
For slicing the apples, I prefer to slice them into a 1/4 inch thick pieces. I find that this thickness allows them to hold together better especially that we are going to be cooking the apple pie filling slightly before placing it into our gluten free pie crust.

You don’t have to get a ruler to measure the apples. You can pretty much eyeball it.
If you like your apple slice it to be thinner, you can slice them thinner, just make sure to cook them for a shorter amount of time when preparing the pie filling.
As you slice the apples, place them directly into the prepared water bath to prevent them from browning.
It is better if you peel, core, and then slice one apple at a time. You do not want to peel all the apples, then core all the apples, and then slice them all at the same time. You are more likely to get browning on the apples if you do so.
It is not a bad thing to get browning, it is just unsightly.
PREPARING THE PIE FILLING FOR OUR GLUTEN FREE APPLE PIE
To prepare the filling, mix the corn starch with the apple cider or water, and set it aside until you’re ready to use it. Apple cider will add another layer of flavor to this apple pie, but if you don’t have it, you can use water as a replacement.
In a deep skillet, add in the butter and melt it on low heat. I know this seams like a lot of butter, but the butter is essential to give it it’s heavenly, creamy, smooth flavor.
After the butter has fully melted, remove from the heat and add in the brown sugar, cinnamon, allspice, nutmeg, cloves, salt and vanilla and mix until everything is well combined.
These spices will give it that classic New England apple pie flavor.
The salt is an essential ingredient. You might think that this is a dessert, we shouldn’t be adding salt, but the fact is, salt is one of the essential ingredients for many desserts. It will turn your desserts from good to amazing because it has the ability of balancing out the flavors.
Return the mixture to the heat. Stir it continuously to prevent the bottom layer of the sugar from burning.
Once the sugar is almost melted, you will know that it is not completely melted because you will still see granules in the mixture, give the cornstarch mix a quick mix and slowly pour it into the pan while continuously stirring to prevent clumping.
As you stir, you will see that the mixture is beginning to thicken. Continue to stir until it reaches a boil. After it has reached the boiling point, continue to stir for 1 minute then remove it off the heat.
If at any time you stop stirring, the bottom layer can burn, and you can also end up with a lot of clumping.
Adding in the apples
Using a large sieve, drain the apples well.
Carefully and gently add in the apple to the sugar mixture. You don’t want anything splashing on you because hot melted sugar can cause sever burning. So wen doing this step, be as careful as you can. Use a spoon if you have to in order to prevent splashing of the super-hot sugary liquid.

Bring the mixture back on medium low heat. Continue to fold the apples in the sugary mixture over medium low heat for 5 minutes.
You can use a silicon spoon or a spatula to fold in the apples in the syrup. Such tools will prevent a layer of the sugary mixture from staying at the bottom and potentially getting burnt.
If you are using thinner slices than I have mentioned above, you can reduce the amount of cooking to 3 to 2 minutes. You will begin to notice that the apple pie filling will continue to thicken as you continue to slightly cook and fold the apples in this delicious mixture.
CHILLING THE PIE FILLING FOR OUR GLUTEN FREE APPLE PIE
Remove the apple pie filling off the heat and Add in the 1 teaspoon of lemon juice. Gently fold it into the mixture. Keep the mixture uncovered and allow it to cool for 5 to 10 minutes. Cover it and place it into the fridge to chill completely before you pour it into the pie crust.
You do not want the mixture to be hot when you pour it into the pie crust because it will damage the pie crust causing it to become soggy and to lose its flakiness.
HOW TO PREPARE A GLUTEN FREE PIE CRUST FOR AN APPLE PIE?
Meanwhile, as the apple pie filling is chilling in the fridge, flour a counter top surface with Chantal’s Gluten Free All Purpose Flour Blend.
Roll the chilled bottom pie crust onto the floured surface into an 1/8 inch to ¼ inch thickness.
Make sure that the pie crust shape is similar to that of the pie pan that you will be using. It should also be large enough to fit inside the pie pan while allowing for 2 inches of pie crust to hang off the sides of the pan.
As you roll the pie crust into shape, make sure to continue to move it on the counter surface and lightly sprinkle the counter surface with the flour mix to prevent the pie crust from sticking onto the counter top.

Gently roll the crust onto the rolling pin without pressing it onto the rolling pin. You just need the rolling pin to help you move it into the pan.
You can also simply lift it and place it into the pan as carefully as you can. I just lay it over my arm and place it directly into the pan. Press in the edges to form the crust into the shape of the pie pan. Cover with plastic wrap and return into the fridge to chill for 10 minutes.
Once the gluten free pie crust and the apple pie filling have chilled, roll the top crust large enough to fit over the pie while also making sure that 2 inches will hang off the sides of the pie pan.
Remove from the fridge. Remove the plastic wrap off the pie crust, place the pie filling into the pie pan while slightly mounding it in the center. Make sure no pie filling touches the edges of the pie crust.
Carefully place the top crust on the pie filling making sure to center it.
PREPARING THE GLUTEN FREE APPLE PIE FOR BAKING
In a small bowl, prepare the egg wash by beating the egg with the 2 tablespoons water. The egg wash will give the apple pie a more beautiful color. It has nothing to do with flavor. It is also easier to tell that the pie is done when using an egg wash.
Lightly brush the edges of the bottom pie crust with the egg wash to help the two crusts stick together. You can also use water instead to do this step. Press the edges of the top crust with the edges of the bottom crust using your fingers.
Using kitchen scissors, cut around the pie crust any excess crust that is longer than 2 inches.
Save any excess pie crust for decorating and a lot more recipes that will be coming soon on the blog.
Wrap it tight with plastic wrap and place it in the fridge if you are planning to use it in the next couple days. If not, wrap it with two layers of plastic wrap, put it in a freezer bag, and place it in the freezer.
To use it the next time, allow it to thaw in the fridge over night, or however long it takes.
Shaping and decorating the apple pie

Fold in the excess 2 inch crust under and tuck it into the pie pan. This will give you these raised pie edges. You can now cut decorative slits into the top pie crust to allow for ventilation, and you can also crimp the edges or use any decorative style on them.

Cover the pie with plastic wrap and place back into the fridge to chill for 20 minutes. You can also cover the egg wash and place it in the fridge until ready to use.

HOW TO BAKE A GLUTEN FREE PIE
Preheat the oven to 425 F.
Remove the pie and egg wash from the fridge. Give the egg wash a quick mix using a fork. Brush the top crust with some of the egg wash.
Place the apple pie on a cookie sheet. This will contain any spills as the pie gets baked in the oven. It will also prevent the bottom from burning. Place the cookie sheet containing the pie onto the center rack of the preheated oven and allow it to bake for 15 minutes.
baking the apple pie at this initial high temperature will prevent the butter from melting and creating a crumbly dough. Instead, it will cause the butter to steam giving us those amazing flakes in return.

After our gluten free apple pie has baked for 15 min on high temperature, reduce the heat to 350 F and allow it to bake for 35 to 45 minutes or until the apples are softened and the pie is hot and bubbly. Although, you might not see bubbles because the filling can form sort of a seal preventing the filling from bubbling over.
If you notice the edges are browning too quickly, you can cover them with some aluminum foil to prevent them from burning.
Gluten Free Brioche Bread With Date Filling
Gluten Free Mediterranean Date Cookies – Maamoul Recipe
Homemade Gluten Free Pop Tarts
Gluten Free Sourdough Bread Rolls

Gluten Free Apple Pie
Ingredients
Equipment
Method
- Peel the apples and core them using a small spoon or an apple corer.
- Prepare a water bath for the apples by combining 2 quarts cold water and a ¼ cup of lemon juice in a large bowl.
- Slice the apples into 1/4 to 1/8 inch-thick slices and place them directly into the water bath as soon as you slice them in order to prevent them from browning.
- Prepare the corn starch mixture by mixing the corn starch with the water or apple cider and set it aside until ready to use.
- Place the butter into a deep skillet and melt it on medium low heat.
- After the butter has fully melted, remove from the heat, add in the brown sugar, cinnamon, allspice, nutmeg, cloves, salt, and vanilla. Stir until combined.
- Return the mixture to the heat placing it on medium low. Stir the mixture continuously until the sugar is almost melted.
- Add in the corn starch mixture while you continue to stir in order to prevent clumping. Allow the mixture to thicken as you stir it continuously. Once it reaches a boil, allow it to boil while continuously stirring for 1 minute. Once the mixture has boiled for 1 min, remove from the heat.
- Using a large sieve, drain the apples well.
- Carefully and gently add in the apple to the sugar mixture. Use a spoon if you have to in order to prevent splashing of the super-hot sugary liquid.
- Bring the mixture back on medium low heat. Continue to fold the apples in the sugary mixture over medium low heat for 5 minutes. You will begin to notice that the mixture will continue to thicken as you continue to slightly cook and fold the apples in this delicious mixture.
- Remove the apple pie filling off the heat. Add in the 1 teaspoon of lemon juice and gently fold it into the mixture. Keep the mixture uncovered and allow it to cool for 5 to 10 minutes. Cover it and place it into the fridge to chill completely before you pour it into the pie crust.
- Meanwhile, as the apple pie filling is chilling in the fridge, flour a counter top surface with Chantal’s Gluten Free All Purpose Flour Blend. Roll the chilled bottom pie crust onto the floured surface into an 1/8 inch to ¼ inch thickness. Make sure that the pie crust shape is similar to that of the pie pan that you will be using. It should also be large enough to fit inside the pie pan while allowing for 2 inches of pie crust to hang off the sides of the pan. As you roll the pie crust into shape, make sure to continue to move it on the counter surface and lightly sprinkle the counter surface with the flour mix to prevent the pie crust from sticking onto the counter top.
- Gently roll the crust onto the rolling pin without pressing it onto the rolling pin. You just need the rolling pin to help you move it into the pan. You can also simply lift it and place it into the pan as carefully as you can. Press in the edges to form the crust into the shape of the pie pan. Cover with plastic wrap and return into the fridge to chill for 10 minutes.
- Once the pie crust and the filling have chilled, roll the top crust large enough to fit over the pie while also making sure that 2 inches will hang off of the sides of the pie pan. Remove from the fridge. Remove the plastic wrap off the pie crust, place the pie filling into the pie pan while slightly mounding it in the center. Make sure no pie filling touches the edges of the pie crust.
- Carefully place the top crust on the pie filling making sure to center it.
- In a small bowl, prepare the egg wash by beating the egg with the 2 tablespoons water.
- Lightly brush the edges of the bottom crust with the egg wash to help the two crusts to stick together.
- Press the edges of the top crust with the edges of the bottom crust.
- Using kitchen scissors, cut around the pie crust any crust that is longer than 2 inches.
- Fold in the excess 2 inch crust under and tuck it into the pie pan.
- You can now cut decorative slits into the top pie crust to allow for ventilation, and you can also crimp the edges or use any decorative style on them.
- Cover the pie with plastic wrap and place back into the fridge to chill for 20 minutes. You can also cover the egg wash and place it in the fridge until ready to use.
- Preheat the oven to 425 F.
- Remove the pie and egg wash from the fridge. Give the egg wash a quick mix using a fork. Brush the top crust with some of the egg wash.
- Place the apple pie on a cookie sheet. This will contain any spills as the pie gets baked in the oven.
- Place the cookie sheet containing the pie onto the center rack of the preheated oven and allow to bake for 15 minutes.
- Reduce the heat to 350 F and allow it to bake for 35 to 45 minutes or until the apples are softened and the pie is hot and bubbly.
- If you notice the edges browning too quickly, you can cover them with some aluminum foil to prevent them from burning.
Disclosure: Some of the links in this post are “affiliate links”. This means if you click on a link and purchase the item, I will get an affiliate commission. It will not cost you any extra money, but it will help me pay for this website, and it will help me to keep providing you with helpful articles such as this one. I only post links to products that I personally use and love, or to products that I wish I could have, and that could be of value to you. The information that I provide you with, my blog, videos, and many resources are free.
Be the first to reply